
User Guide

446
About Billboards
The controls you create do not appear on the dialog. You can only see their content
items, which you add in the next step.
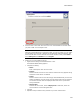
5. Add content items to each billboard control:
• Right-click the dialog and select Billboards > BillboardControlName, where
BillboardControlName is the name of the control. This makes the control active.
• Right-click the dialog, select Billboards > Add Control, and select Bitmap, Icon,
or Text.
A properties dialog appears. The tabs that appear vary depending on the type of
control.
• For bitmaps or icons, click the Graphic tab and select a graphic or click Set to
import a new graphic. Graphics must be in .BMP format. See Setting the Graphic
for a Control on page 441.
For text controls, enter text in the Control Text field. See Basic Control Settings
on page 436.
• You can add multiple content items to each control.
• Make sure each content item is within the outline that represents the billboard
area.
If you add large content items, you can resize the Progress Dialog itself to
accommodate them. Also, you might need to resize bitmap items for them to
display correctly.
6. To preview the billboard, select each billboard in order from the Billboard submenu
of the right-click menu.
7. To see the billboard work, compile and run the installation.
Note
Billboards do not appear when you test the installation. This is because files are not installed
during a test, so the InstallFiles event is never triggered. To view the billboards, you must run
the installation. See Running An Installation on page 96.
To edit an existing billboard:
Always select the billboard control name first by right-clicking and selecting Billboards >
BillboardControlName, where BillboardControlName is the name of the billboard control.
This makes the control active, which means that any editing you do is applied to that
billboard.