
User Guide
443
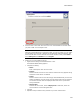
About Dialog Controls
• Vertically. Center within the top and bottom edges of the dialog.
• Horizontally. Center within the left and right edges of the dialog.
All selected controls are centered in the dialog.
Making Dialog Controls the Same Size
You can make multiple controls on a dialog the same size.
1. In Setup Editor > Dialogs tab, select a dialog in the left pane.
2. In the right pane, select 2 or more controls.
The last control you select is the master control that the other controls will be sized
to.
3. Select Layout menu > Make Same Size and then select one of the following. (In
Visual Studio: Format menu > Make Same Size.)
•Width.
•Height.
•Both.
All selected controls are sized to the master control.
Spacing Dialog Controls Evenly
You can space controls on dialogs evenly between the leftmost and rightmost controls
(for horizontal spacing) or the topmost and bottommost controls (for vertical spacing.)
1. In Setup Editor > Dialogs tab, select a dialog in the left pane.
2. In the right pane, select 2 or more controls.
3. Select Layout menu and then select one of the following. (In Visual Studio: Format
menu.)
• Horizontal Spacing > Make Equal. Space items left to right.
• Vertical Spacing > Make Equal. Space items up and down.
All selected controls are spaced evenly on the dialog.
Setting Dialog Tab Order
You can determine the tab order of controls on dialogs.
1. In Setup Editor > Dialogs tab, select a dialog in the left pane.
2. Click anywhere on the dialog to set focus.
3. Select Layout menu > Set Tab Order. (In Visual Studio: View menu > Tab Order.)
This is disabled unless you set the focus on the dialog first.
A black box appears for each control. The numbers on the boxes indicate the tab
order.
4. To set the new tab order for the dialog, click the controls in order. Each control turns
blue as its new tab order is assigned.
If the first several items have the correct tab order, and you want to begin
renumbering the tab order at a later number, hold down the Ctrl key and click the
control after which you want to renumber. Example: If controls 1 through 7 have the
correct tab order, and you want to start renumbering from 8, press Ctrl and click
control 7. Then continue setting tab order starting from control 8.
5. (Visual Studio integrated editor only.) Before working in another project in the
solution, save the installation to set the tab order.