
User Guide
441
About Dialog Controls
! Action
The action to take when the condition is true.
! Condition
If you enter a condition for the event, the event occurs only if the condition is true. If
there is no condition, the event always occurs. For details, see Conditions on
page 406.
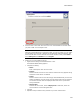
Setting the Graphic for a Control
The Graphic tab, which appears on the Properties dialog for graphical dialog controls,
lets you specify a graphic file for the control. It determines the image displayed in the
control. Not all controls can display graphics. See Editing Dialog Controls on page 436.
! Graphic Name
The drop-down list displays graphics stored in the Binary table. Select a graphic or
click Set to import a new graphic. Graphics must be in .BMP format.
! Information
Displays information about the graphic, including the number of colors in its palette,
its width and height, and its size.
! Preview
Displays the image. If necessary, the image is scaled down to fit in the preview area.
Setting the Items in a Control
The Items tab, which appears on the Properties dialog for list box controls, comboboxes,
listview controls, and radio button controls, determines the items that are listed in the
control. It also lets you determine the tab order of the items, and set the vertical
position (which determines the order of the items on the dialog). See Editing Dialog
Controls on page 436.
All controls that share the same property name also share the same list of items.
Example: Suppose you make a radio button control, associate the property ITEM_LIST
with it, and add 3 items to it. Then on another dialog, you make a listview control and
associate ITEM_LIST with it. If you look at the Items tab for the listview control, it
contains the same items as for the radio button.
! To add a new item, click Add.
! To edit a selected item, click Details.
! To remove a selected item from this control, click Delete.
! To rearrange the order in which the items are displayed, click Move Up or Move
Down. To change the order in which the items appear on the dialog, double-click
each item and set its Y coordinate.
When you click Add or Details, a details dialog appears, where you can specify the text
that appears in the control.
The settings available on this tab vary depending on the type of control.
! Text
The text of the button or list item.
! Value
The value returned to the control’s property when the item is selected.
! Icon Name
Select an icon from the list or click Set and select an icon file on your hard drive. The
icon you set appears next to this item in the list control. This option does not appear
for all types of controls.