
User Guide

407
Conditions
Conditions for Controls on Dialogs
In Setup Editor > Dialogs tab, you can use conditions with dialog controls. Controls are
the items that appear on dialogs, such as text boxes, radio buttons and checkboxes.
Because many conditions are already set on the default installation dialogs, you can use
those for examples of how you might use conditions in dialogs. View them in Setup
Editor > Dialogs tab.
! Conditions that set the state of controls
You can create a condition that sets a control to be enabled, disabled, shown, hidden,
or set as the default control.
Example: If you double-click the Next button on the License Dialog in Setup Editor >
Dialogs tab, then on the Conditions tab on the Properties dialog you see 3 conditions
attached to the Next button. These conditions determine the state of the Next
button. They are all based on the value of a property named Accept. The Accept
property is set to “Yes” when the end user clicks the I accept the license
agreement radio button. As soon as Accept equals “Yes”, the Next button becomes
enabled and set to the default control. (To see how the Accept property is set,
double-click the radio buttons on the License Dialog, then look at the Items tab on
the Properties dialog.)
! Conditions attached to control events
You can attach an event to a control. The event can have an associated condition.
You might attach events to Next buttons that specify what event happens if the Next
button is clicked.
Example: Click the Installation Type Dialog in Setup Editor > Dialogs tab. Double-
click the Next button and click the Events tab on the Properties dialog. Depending on
what the property InstallMode is set to, different dialogs appear, as specified in the
NewDialog events. If the end user selects the Custom radio button, InstallMode is set
to Custom, and the Select Feature Dialog appears. If the end user does not select the
Custom radio button, the Start Installation Dialog appears. The value of the
InstallMode property is determined by the end user’s radio button choice.
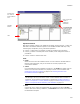
Conditions Attached to Components
You can attach conditions to components in Setup Editor > Components tab. (You can
also add them to components on the Features tab.) If you attach a condition to a
component, the component is installed only if the condition is true. To add or change a
condition attached to a component, right-click a component icon and select Details. Use
the Condition field on the Component Details dialog that appears to add or change a
condition.
If you add conditions to the Features page, and add items to the conditions using the
Current Feature drop-down list at the top of Installation Expert pages, then some of
the components on the Components tab will have conditions set.
Note
If you add a component condition that checks the installed state of a component or feature,
add the merge module CondFix.msm to the installation. This merge module fixes a Windows
Installer limitation; see WiseFixConditions on page 409.
Condition Guidelines
Before creating conditions, become familiar with the following Windows Installer
guidelines for creating conditions.
! You can use the following types of values inside a condition: