
User Guide

387
Features Tab
To unassign a component:
1. In Setup Editor > Features tab, expand the folder for the feature that contains the
component to unassign.
2. Click the Components icon. All components for the feature appear in the upper right
pane.
3. In the upper right pane, right-click a component and select Unassign.
Components that are not assigned to any feature are not installed on the destination
computer.
To move a component to a different feature:
1. In Setup Editor > Features tab, expand the folder for the feature that contains the
component to move.
2. Click the Components icon. All components for the feature appear in the upper right
pane.
3. In the upper right pane, click a component and drag it to a different feature in the
left pane.
The component is moved to the new feature.
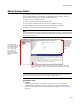
Modules Icon
The Modules icon displays merge modules included in specific features. However, you
cannot add merge modules here. To add or edit merge modules in an installation, use
Installation Expert > Merge Modules page. See Adding a Merge Module to an Installation
on page 344 and Editing Merge Module Details on page 346.
To view merge modules in a feature:
1. In Setup Editor > Features tab, expand a feature.
2. Click the Modules icon.
The merge modules in the selected feature appear in the upper right pane.
If the Advertising icon does not appear, right-click and select Hide Empty Folders/
Items.
Also see:
About Merge Modules on page 330
Advertising Icon
The Advertising icon contains information that Windows Installer uses when publishing
and assigning applications to the destination computer. The Advertising icon:
! Shows the entry points that are installed if you are using advertising to make
applications available to end users.
! Lets you edit and create new file associations. See Adding File Associations on
page 158.
Note
The Advertising icon might contain other advertising items besides file extensions but you
can add extensions only.
! Lets you view and edit AppID and ProgID information.