
User Guide


304
Patches
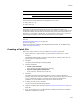
These patches would be applied to the applications in this order:
! Family 100: A, C, D
! Family 200: B, D
Note
This feature was developed and tested with the RC1 build of Windows Installer 3.0;
unexpected results may occur with the final version of the runtime. As of this release of Wise
for Windows Installer, Microsoft had not released the final version of Windows Installer 3.0,
therefore, it is not included in this product. To use this feature, obtain an RC or production
build of Windows Installer 3.0 from Microsoft and install it on your computer.
Also see:
Specifying the Patch Sequence on page 308
Patches on page 302
Search for “Sequencing Patches” and “MsiPatchSequence Table” in the MSDN Library
(msdn.microsoft.com/library/).
Creating a Patch File
Before you create a patch file, see the guidelines in Patches on page 302.
1. Select Tools menu > Patch Creation. (In Visual Studio: Project menu > Patch
Creation.)
The Welcome dialog appears, listing the basic steps for creating a patch file. The
wizard guides you through each step.
2. Click Next.
The Specify Patch Settings File dialog appears.
3. Complete the dialog:
• Create a new patch file
This creates a new patch settings file (.PCP file).
• Open an existing patch settings file
If you mark this, also specify the .PCP file.
4. Click Next.
The Specify Previous Versions dialog appears, where you select .MSI files of
previous versions that this patch updates, referred to as targets. When this patch is
run on a destination computer, it verifies that a valid target exists before
installation. You must add at least one previous version to this list.
5. To add a previous version, click Add.
The Previous Version Details dialog appears.
6. Complete the dialog and click OK. See Specifying Previous Versions for Patches on
page 306.
7. If you are prompted to run an administrative installation because the installation
database is compressed, click Yes.
D Application1 100 3
Application2 200 2
Patch Updates Family Sequence