
User Guide

281
Package Distribution
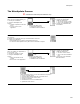
The Welcome dialog appears.
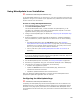
2. If you are in a .WSI that contains multiple releases, a drop-down list appears. Select
a release.
3. Mark Distribute to share point directory.
4. Click Next. If necessary, the installation file is saved and compiled.
The Distribute to share point directory dialog appears.
5. Share Point (read-only) displays the share point directory to which the installation
will be copied. It defaults to the share point directory that is specified in Wise
Options.
6. The Copy Installation File To checkbox enables Pathname. During distribution, a
copy of the installation file is placed in the directory you specify here, and its source
paths are updated to reflect the location of the source files in the share point
directory.
Caution
(Wise Editor only.) If an installation file is located in the share point directory, Copy
Installation File To is cleared by default. If you mark it, then 2 copies of the installation
file will be in the share point directory, which can lead to confusion about which file to
edit.
Caution
(Visual Studio integrated editor only.) If you clear this checkbox, the source paths in the
project will be overwritten with the paths in the share point directory. If the project is
bound to other projects in the solution, these bindings will be broken.
• In most cases, if the installation file is not already in the share point directory, it
is best to specify the Scripts\<application name>\<package name> subdirectory
of the share point directory, which is the default.
• If you are distributing an .MSI or .WSI that is set to compile with external files,
specify either a subdirectory of Scripts or some other directory. This prevents
overwriting of any external files that might also be used by another installation.
To verify how the installation is set to compile, go to the Media page and look at
the Compression Option on the Media Details dialog.
• Clear this if you don’t want to copy the installation file (recommended in the
Wise editor only).
7. Application Name and Package Name are pre-filled with data from the Product
Details page; the application and package names are used if defined, otherwise, the
product name and version are used. These names will be assigned to the installation
when it is imported into the Software Manager database.
If the package’s meta data is in the Software Manager database, don’t change these
names. If you change the names, you will have 2 packages in the database for the
same installation: a package with just meta data and the package you import. See
Adding Meta Data to the Software Manager Database on page 102.
8. Click Finish.
If a package with resources and the same package path is already in the Software
Manager database a warning message appears asking if you want to overwrite it.
Click Yes to re-import the package.