
User Guide


222
About Web Installations
6. Select the new directory and click Details.
A details dialog appears with several tabs. These tabs correspond to options in
Microsoft Internet Information Server (IIS).
7. Set the options on the dialog. See IIS documentation for help on options. Also see
Setting Details for Web Sites, Virtual Directories, and Web Folders on page 224.
Setting Installation Options for a Web Installation
" Professional and Enterprise Editions only.
An important part of setting up a Web installation is specifying the installation options
that will be available to the end user at runtime. To do so, use the Web Dialogs button
which appears on the Web Site tab of the details dialog for Web sites and top level
virtual directories. It opens the Web Installation Configuration wizard.
You set options for each Web site or top-level virtual directory you have added on the
Web Files page. This sets options for the item’s child virtual directories as well. If a Web
site or top level virtual directory has multiple virtual directories, you can apply the
setting you choose for one virtual directory to all virtual directories. If you omit the
procedure below, no Web configuration dialogs appear to the end user, and the
installation attempts to apply the defaults for all items.
Note
If you created a virtual directory directly under Destination Computer on the Web Files page,
then you can follow this procedure to set installation options for it. If the virtual directory is
under a Web site, then the Web Dialogs button is not available.
Caution
If you customize IIS dialogs, do not go through the Web Dialogs wizard again. It replaces all
the IIS dialogs each time you do so. Do not reorder dialogs that start with IIS that are added
as a result of this wizard. If their order is changed, the installation will not work.
To specify what options the end user can configure at runtime:
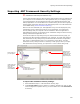
1. Select Installation Expert > Web Files page.
2. In the lower left list box, select a Web site or a top level virtual directory and click
Details. If you don’t see the item you want, make sure you have the correct feature
selected in Current Feature.
On the Web Site tab of the details dialog, click Web Dialogs.
Note
If the current installation was built in an older version of Wise for Windows Installer, you
are prompted to first convert the dialogs on the Dialogs page. Converting resets
navigation and conditions, so if you have customized the dialogs, back up this installation
before converting.
The Web Site Configuration dialog appears.
3. Complete the dialog: