
User Guide


130
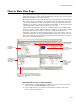
Files or Web Files Page
Also see:
Files or Web Files Page on page 121
Adding Files to an Installation on page 123
Adding .NET Assemblies to the Installation
Note
The ability to create .NET installations is supported only by Windows Installer 2.0 or later.
When you create a .NET installation, you can use the Files or Web Files page to add .NET
assemblies. When you add a file that is a .NET assembly to an installation, the
MsiAssembly and MsiAssemblyName tables are updated.
If the .NET Framework is installed on your computer, the following tasks are performed
automatically when you add a .NET assembly. If the .NET Framework is not installed,
you must perform these tasks manually; see Creating a .NET Installation Without the
.NET Framework on page 215.
! Files contained in a multifile assembly are added when the main assembly file
(containing the manifest) is added.
! Depending on the Scan Dependencies option in Wise Options, you either enter
assembly dependencies manually, or they are scanned and added automatically, or
they are scanned and you are prompted to add them.
! Assembly attributes are added to the Assembly tab of the File Details dialog.
! In a mixed installation (.NET and Win32), registry keys are added to register .NET
assemblies so that they can be called as though they were COM components.
You can install assemblies into the Global Assembly Cache, the WinSxS directory, or a
private directory. Each of these directories is used in a different way:
Global Assembly Cache
Assemblies that will be shared by many applications on the destination computer should
be installed into the Global Assembly Cache directory. Assemblies installed into the
Global Assembly Cache must be strongly named. A strong name consists of an
assembly’s identity—its simple text name, version number, and culture information (if
provided)—strengthened by a public key and a digital signature generated over the
assembly. The Global Assembly Cache directory appears only if .NET Application or
Mixed (.NET and Win32) is selected as the application type on the Product Details
page. See Installation of Assemblies to the Global Assembly Cache in the Windows
Installer SDK Help.
WinSxS
To enable side-by-side sharing of a Win32 assembly, install it into the WinSxS directory,
which is under the Windows directory on Windows XP. Assemblies installed into WinSxS
must be strongly named. On Windows XP, shared assemblies are installed as side-by-
side assemblies. See Side-by-Side Assemblies in the Windows Installer SDK Help.
Private directory
If an assembly is private, used by only one application, install it into any installation
directory, provided its path contains a maximum of 256 characters. See Private
Assemblies in the Windows Installer SDK Help.