
User Guide


129
Files or Web Files Page
Adding Files From Outside the Solution
" Visual Studio integrated editor only.
When you add files from outside a solution to an installation that is part of a solution,
those files do not appear in the Source Files tree under the installation project in
Solution Explorer. In addition, you cannot add those files to source control, because
Visual Studio .NET does not allow files outside a solution to be managed with source
control.
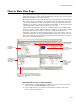
The Copy Source Files dialog, which appears the first time you save or build a solution
after adding files from outside the solution, lets you copy the source files to the solution
directory. If you click Cancel on the Copy Source Files dialog, that file is not copied and
the dialog will not appear again for that file. If you do not copy source files with the Copy
Source Files dialog, you can use Convert Source Paths instead. See Changing Source
Paths in an Installation on page 325.
Note
Files that you add to the installation from the Wise Software Repository do not appear on the
Copy Source Files dialog, even though they are outside the solution, because you cannot copy
those files to a different directory.
To copy files to the default solution directory:
This is the recommended way to copy source files.
! When the Copy Source Files dialog appears, click OK.
All files that are listed in the dialog are copied to the default solution directory, which is
listed in the Copy To column, and their source paths are changed in the installation.
When the files are successfully copied, they appear in the Source Files tree in Solution
Explorer.
To copy files to a specified directory:
This lets you copy the source files to a directory other than the default solution path.
1. On the Copy Source Files dialog, select the file to copy.
2. Click Change Selected Path.
The Change Selected path dialog appears. Current Directory displays the current
location of the file.
3. Complete the dialog:
• Change to
Specify the directory.
• Change Sub-Directories
Mark this to copy files in all subdirectories of the current directory.
4. Click OK.
On the Copy Source Files dialog, the new directory path is listed in the Copy To
column.
5. Repeat these steps to copy additional files.
6. Click OK on the Copy Source Files dialog.
The files are copied to the locations you specified, and their source paths are
changed in the installation.