
User Guide


127
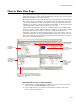
Files or Web Files Page
Also see:
Downloading Redistributable Files on page 39
Adding Files From the Wise Software Repository
" Enterprise Edition only.
The Files in Repository dialog appears when a file that is used by a package in the Wise
Software Repository is added to an installation. Typically, it appears when you add a file
to the Files or Web Files page. It might also appear after you run tools that add files to
an installation (example: ApplicationWatch). The Files in Repository dialog lets you add
the version of the file that is in the repository, which ensures that you use the correct
versions of file resources in applications you develop.
Example: An approved version of the file Sample.dll is stored in the Wise Software
Repository and is used by several packages in the Software Manager database. When
you add Sample.dll to an installation, you can select the version in the repository as the
source for the file.
To add a file from the Wise Software Repository:
On the Files in Repository dialog, mark the checkboxes of files to add and click OK.
The file’s source path is set to the same location as the version in the Wise Software
Repository. You can see the source path on the File Details dialog > General tab.
Caution
If you are working in a Visual Studio solution, selecting a file outside the solution breaks the
integration of the installation with the solution. When you build the solution, the outside file
will not be built. Also, a source file outside the solution cannot be added to source control.
To hide this dialog in the future:
From Show this Dialog, select Hide. This turns the dialog off for all instances in which
it would normally appear.
To make the dialog appear again, click the Prompts tab in Wise Options and activate the
dialog.
See Viewing Shared File Resources on page 140.
Adding Contents of Directories to the Installation
You can add the entire contents of a directory to an installation or use wildcard filters to
add only specified files in the directory. You can also link a directory that you add to the
installation so that it is dynamically updated when the source directory changes.
1. Select Installation Expert > Files or Web Files page.
2. From Current Feature, select a feature or condition. (Because any item you add
must be assigned to a specific feature, you cannot add an item when All Features
is selected.)
Items you add to a feature are only installed on the destination computer if the
feature is installed. Items you add to a condition are only installed if the feature is
installed and the condition is true.
3. In the upper left list box, select a directory whose contents you want to add.