
User Guide


124
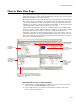
Files or Web Files Page
files to the share point directory. If you do so, the .QUE file for that package is reset and
you must re-import the package in Software Manager.
From Installation Expert:
1. Select the Files or Web Files page.
2. From Current Feature, select a feature or condition. (Because any item you add
must be assigned to a specific feature, you cannot add an item when All Features
is selected.)
Items you add to a feature are only installed on the destination computer if the
feature is installed. Items you add to a condition are only installed if the feature is
installed and the condition is true.
3. If the directory where the file is to be added is not listed in the lower left list box:
• Select the directory under which the new directory should be created.
• Click New Folder, enter a directory name, and click OK.
The directory you specify will be created on the destination computer if it does not
exist.
Note
When you add a directory, you might not see it when you select another feature from
Current Feature. To display directories for all features, mark the View directories for
all features on Files page checkbox in Wise Options.
4. In the lower left list box, select the directory to which the file will be added.
5. In the upper two list boxes, which show the directories (left) and files (right) on
your computer, navigate to a file and double-click it or drag it to the lower right list
box. You can select multiple files.
If you attempt to add files to the Destination Computer icon or the Program Files
directory, you are prompted to first create a folder to hold the files.
The file is added to the selected folder and appears in the lower right pane. If other
dialogs appear, see Additional Dialogs below.
From the Features tab in Setup Editor:
1. On the Features tab, expand a feature and then expand its Combined folder.
2. Expand the Files icon.
If the Files icon does not appear, right-click and select Hide Empty Folders/Items.
3. To add a new directory, right-click a directory and select New > folder.
4. To add a file, right-click a directory and select New > File.
The Add Files to Installation dialog appears.
5. Specify one or more files and click Open.
The file is added to the selected folder and appears in the upper right pane. If other
dialogs appear, see Additional Dialogs below.
From the Components tab in Setup Editor:
1. On the Components tab, expand a component.
2. Right-click the Files icon and select New > File.
If the Files icon does not appear, right-click and select Hide Empty Folders/Items.
The Add Files to Installation dialog appears.