
User Guide

108
Features Page
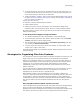
! To rearrange features, click Move Up and Move Down at the right of the page. You
can move features within their current level only, in their current sibling group. You
cannot move features to their parent or child levels.
! To add a condition to a feature, click its name and click Add Condition at the right of
the page. See Using Conditions With Features on page 115 and Adding and Deleting
Feature Conditions on page 115.
Use the right-click menu to:
! Expand or collapse a selected feature’s children.
! Display hidden features.
! Display the features’ titles as they appear on the Select Feature dialog during
installation rather than the features’ names, which are used by Windows Installer.
Any display option you select from the right-click menu overrides the corresponding
setting in Wise Options.
To See How Features Appear During Installation
1. In a sample installation file, add a second feature on the Features page.
2. On the Files page, add a file to each feature. Select the feature from the Current
Feature drop-down list before adding the file.
3. On the Dialogs page, clear the checkbox for Installation Type Dialog, and mark
the checkbox for Select Feature Dialog.
4. Click Test in the lower right corner of the main window. (In Visual Studio: select
Project menu > Start in Test mode.)
The Select Feature dialog in the installation program reflects the options that you set on
the Features page.
Strategies for Organizing Files Into Features
It is important to create and organize features and define conditions in a logical way; not
doing so can result in non-functional versions of your application being installed.
Features in an installation appear in a tree structure, which lets you place features in
hierarchical relationships. You can add a feature at the same level as another feature
(sibling level) or as a child of another feature. Sibling features can be installed
independently of each other, while child features can be installed only if their parent
feature is installed.
The core resources for an application should always be in a top-level feature. The core
feature should install a functioning version of your application; it should have no
dependencies on resources that are in optional features.
When Windows Installer repairs an installation due to corruption or deletion of a
resource, it repairs the entire feature. Example: If an advertised shortcut is part of the
top level feature, and that advertised shortcut gets deleted, the entire application is
reinstalled during the repair. Therefore, isolate advertised shortcuts and their .EXEs into
their own sub-features to avoid complete reinstallation and result in more efficient
repairs.
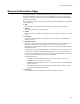
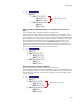
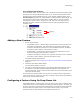
Place dependent features below required core files:
In the illustration below, the features Internal_Text_Editor and Internal_Graphics_Editor,
which are built into the application, are dependent on the presence of the core
application files, which are assigned to the Core feature. By making them children of the
Core feature, you ensure that they are never installed without the Core feature.