
User Guide

19
Chapter 3. User Interface
3.1. Introduction
By now you have installed Wireshark and are most likely keen to get started capturing your first packets.
In the next chapters we will explore:
• How the Wireshark user interface works
• How to capture packets in Wireshark
• How to view packets in Wireshark
• How to filter packets in Wireshark
• ... and many other things!
3.2. Start Wireshark
You can start Wireshark from your shell or window manager.
Tip!
When starting Wireshark it's possible to specify optional settings using the command line.
See Section 10.2, “Start Wireshark from the command line” for details.
Note!
In the following chapters, a lot of screenshots from Wireshark will be shown. As Wireshark
runs on many different platforms with many different window managers, different styles
applied and there are different versions of the underlying GUI toolkit used, your screen
might look different from the provided screenshots. But as there are no real differences in
functionality, these screenshots should still be well understandable.
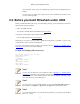
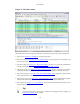
3.3. The Main window
Let's look at Wireshark's user interface. Figure 3.1, “The Main window” shows Wireshark as you would
usually see it after some packets are captured or loaded (how to do this will be described later).