
User Guide


File Input / Output and Printing
70
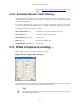
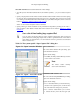
Figure 5.6. "Save" - old GTK version
Unix/Linux: GTK version < 2.4
This is the file save dialog of former Gimp/GNOME
versions - plus some Wireshark extensions.
With this dialog box, you can perform the following actions:
1. Type in the name of the file you wish to save the captured packets in, as a standard file name in your
file system.
2. Select the directory to save the file into.
3. Select the range of the packets to be saved, see Section 5.9, “The Packet Range frame”
4. Specify the format of the saved capture file by clicking on the File type drop down box. You can choose
from the types, described in Section 5.3.2, “Output File Formats”.
The selection of capture formats may be reduced!
Some capture formats may not be available, depending on the packet types captured.
File formats can be converted!
You can convert capture files from one format to another by reading in a capture file and
writing it out using a different format.
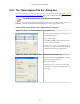
5. Click on the Save/Ok button to accept your selected file and save to it. If Wireshark has a problem
saving the captured packets to the file you specified, it will display an error dialog box. After clicking
OK on that error dialog box, you can try again.
6. Click on the Cancel button to go back to Wireshark and not save the captured packets.
5.3.2. Output File Formats
Wireshark can save the packet data in its "native" file format (libpcap) and in the file formats of some
other protocol analyzers, so other tools can read the capture data.