
Installation Manual

page | 12
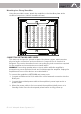
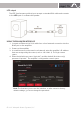
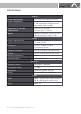
CONNECTING TO TV
HDMI (recommended)
1. Connect an HDMI cable from the HDMI OUT (ARC) output on the back of the
amplifier to the HDMI IN (ARC) input on your TV.
Notes:
• An HDMI connection supports digital audio and video with a single connector.
It is the best option for connecting your amplifier.
• If your TV features an HDMI ARC connector, you can enjoy the TV audio
through your amplifier by using a single HDMI cable.
• An HDMI connection is required if you intend to connect additional source
devices to the amplifier’s AVR inputs to display them on your TV.
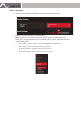
• If you want to enable HDMI CEC, you must do so on both your TV (using
the TV’s user interface) and on the Mini-5.1 AVR (using the browser user
interface). HDMI CEC (consumer electronics control) is a feature that allows
compatible devices to be controlled from a single remote control. For details,
refer to your TV’s instruction manual.
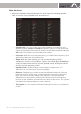
Optical digital input
1. Connect the OPTICAL IN connector of the amplifier to the OPTICAL OUT
connector of your TV with an optical cable.
2. Enable Use Optical through the browser user interface.
Notes:
• Make sure the protective cap has been removed from both ends of the optical
cable.
• Make sure you have connected one optical adapter
before
inserting into the
amplifier.
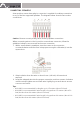
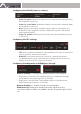
CONNECTING TO OTHER DEVICES
HDMI (recommended)
To connect other audio/video sources such as a satellite receiver, DVD player,
and game console, we recommend you connect them using HDMI to one of the 3
HDMI inputs of the amplifier.
1. Connect one of the 3 HDMI IN on the back of the amplifier to the HDMI OUT
output on your audio/video source using an HDMI cable.
Note:
• We strongly recommend you connect other audio/video sources directly
to the amplifier, and not directly to the TV. This is the best way to ensure
the best possible multichannel audio format / audio signal is reproduced
accurately for each source.