
Cut Sheet


Source I Series Flush Activations Installation Diagrams
Establish location for the fitting,
then core drill a 4" [102mm]
diameter hole through the
concrete to the top of the duct.
Next, drill a 2 1/2" [64mm]
diameter opening in the top
of the duct, making sure this
opening is in the center of the
4" [102mm] hole.
1.
4" [102mm] Core
Drilled Hole
2 1/2" [64mm]
Dia. Hole
Duct
2.
Install the 439 Attaching Ring
using the two locking tabs
to secure it to the duct.
3.
Connect the carpet flange to
the attaching rings using the
four screws provided.
4.
Install the two duplex
receptacles and the double
duplex plate to complete
the installation.
5.
439 Attaching
Ring for
use with
Polycarbonate
Fittings Only
and Only as an
Afterset.
Carpet
Flange
Double Duplex
Plate with
Membrane
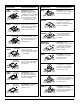
S175 Double Duplex Power Activation
Pull wires through the hole in the
bottom of the attaching rings.
The adjusting ring should then
be installed at the desired height.
Wire device and attach to the
adjusting ring.
After the gasket is put in place,
attach the flange to the
adjusting ring.
For Power: The flip lid cover
plate can be attached to
the flange.
1.
Wiring Device
2.
For Communication: Turn self
storing slides upside down with
thin edge to the inside. Attach
cover plate to flange.
3.
Power Cover
Plate S125B
Carpet Plate
S124B (Shown)
or
S124 BLK/BRN
Neoprene Gasket
Communication Cover
Plate 829STC (Shown)
or 829PSTC-BLK/BRN
Activation Guidelines – Flush Using 437 Ring
Adjusting Ring
897AR for Power
(Shown) 898AR
for Communication
Attaching Ring
4" [102mm] Core Drilled Hole
Duct 2 1/2" [64mm] Dia. Hole
439 Attaching Ring for Use
with Polycarbonate Fittings
Only and Only as an Afterset
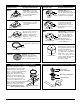
Establish location for the fitting, then core drill a
4" [102mm] diameter hole through the concrete
to the top of the duct.
1.
Next, drill a 2 1/2" [64mm] diameter opening in
the top of the duct, making sure this opening is
in the center of the 4" [102mm] hole.
2.
Install the 439 Attaching Ring, using the two
locking tabs to secure it to the duct.
3.
Connect the carpet flange to the attaching ring,
using the four screws (#6-32 flathead) provided.
4.
For communication cover plate: Reverse the
communication slides as necessary to allow
cable egress, and install the cover plate, taking
care to avoid pinching any cables.
NOTE: The receptacle mounting shelf can be
broken out to create additional cable
space when the communication cover
plate is used.
For duplex cover plate: Install the wiring device
onto the carpet flange and secure the cover
plate over it, making sure the plug-through
membrane is in place.
5.
Carpet Flange
S124BLK/BRN
Duplex Plate with
Membrane S130BLK/BRN
Polycarbonate — Using a 439 Afterset Attaching Ring
© Copyright 2015 Legrand All Rights Reserved
ED785R10 – October 2015 – For latest specs visit www.legrand.us/wiremold
Electrical Wiring Systems
60 Woodlawn Street
West Hartford, CT 06110
Phone: 1.877.BY.LEGRAND (295-3472)
www.legrand.us
570 Applewood Crescent
Vaughan, Ontario L4K 4B4
Phone:905.738.9195
www.legrand.ca