
Installation Manual


4
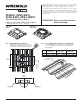
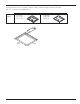
Step 7 ADJUST BOX HEIGHT
Install box cover. Adjust height to screed line.
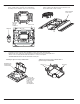
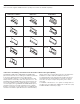
Step 8 MOUNT FIRE PROTECTION
Slide fire protection flute closure over carriage bolts
projecting below deck surface. Use additional 1"
[25mm] tall board for 3" [76mm] tall deck profiles.
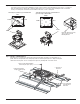
Step 9 INSTALL BOTTOM PAN
Remove knockout tab(s) on bottom pan as required
to allow conduit feed(s) to pass through. Remove
corresponding plug(s) in fire board. Partially thread
(2) toggle nuts onto carriage bolts in opposite corners
for temporary mounting. Align holes in pan and board
over carriage bolts and push over toggle nuts until
wings expand.
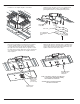
Step 10 COMPLETE INSTALLATION
Attach fender washers and wing nuts to remaining two
carriage bolts. Remove (2) temporary toggle nuts and
replace with remaining fender washers and wing nuts.
Tighten until fire board contacts deck.
Slide Insulation over
Carriage Bolts
Flute Closure
Use 1" [25mm] Board
for 3" [76mm] Deck
profiles
Remove knockout
tabs as required
Thread 2 Toggle
Nuts onto end of
Carriage Bolts
(One each corner)
Attach Fender Washer
and Wing Nut onto
Carriage Bolt
NOTE: Toggle Nuts are temporary. Toggle Nuts must
be replaced with a Fender Washer and Wing
Nut to maintain Fire Classification.
CAUTION: Failure to install bottom insulation
will void Fire Classification.