
Installation Instructions


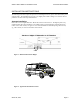
Table Of Contents

Wireless Matrix MBS2-LP Installation Guide Document MBUD-0088v1
March 04, 2004 Page 3
INSTALLATION OVERVIEW
Installation
Installing the Wireless Matrix MBS2-LP is not difficult, but you must consider the variables involved, such
as, the truck type and location of existing equipment. Installation time can vary depending upon the
installer’s experience and the vehicle design. While a single individual can perform most installation
operations, certain procedures may require the help of a second person. Wireless Matrix offers an
installation training program, or can recommend installation vendors in your area who can performs the
installation.
Some of the following procedures may require a choice between several hardware options. Some options
are not suitable for some installations, so Wireless Matrix recommends that you verify vehicle integrity
with the vehicle OEM to ensure that the vehicle structure can support the Wireless Matrix MBS2-LP
components. Also, verify that you have the parts and tools necessary to complete the installation.
To install the Wireless Matrix MBS2-LP, follow these steps:
1. Select location for mounting the antenna. Assess cable routes while considering antenna
placement.
2. Determine the type of bracket to use, and contact the vehicle OEM for bracket availability.
3. Determine if the proper Wireless Matrix MBS2-LP installation requires temporary removal of
vehicle components.
4. Install the shelf or bracket.
5. Install the antenna.
6. Install the power-data cable.
7. Secure all cables to rigid mounts with cable restraints.
8. Verify operation of the Wireless Matrix MBS2-LP.
SYSTEM CONNECTIONS
The Wireless Matrix MBS2-LP connects to the CSC in a variety of ways, depending on configuration. It
can connect by either a DB9 straight through power extension cable or directly to the DB9 connector on the
supplied power-data cable. It can also connect via 802.11b protocol, or via Ethernet connection.