
Installation Instructions
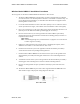
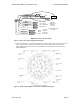


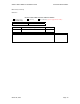
Table Of Contents

Wireless Matrix MBS2-LP Installation Guide Document MBUD-0088v1
March 04, 2004 Page 9
Battery / Ign Cable
To Battery Pos
To Battery Neg
To Ignition
Battery Neg
Black No 10 to 12 AWG
Battery Pos.
Red No 10 to 12 AWG
Ignition
White
No 18 AWG
Recommended Battery/
Ignition Cable
5 Amp
Fuse
Figure 6. Power Extension Cable Installation Diagram
20. Connect the ignition sensor (white, 18 AWG lead) to its corresponding ignition fused
connector at the vehicle’s distribution box using a fuse connector.
21. Select a common grounding point and connect the negative, grounding-wire lead (black, 10 to
12 AWG lead) to its ground (the negative battery lead can be used).
22. Connect the positive (red, 12 AWG lead) and the negative (black, 12 AWG lead) of the power
extension cable to the corresponding positive and negative leads of the power-data cable.
23. Connect the separate ignition extension cable (white, 18 AWG lead) to the corresponding
ignition sensor on the power-data cable (orange/red, 22 AWG lead).
24. Once the power-data cable is installed, assemble the DB9 connectors for the CSC and Test
Ports (use the Cable Configuration Diagram, Figure 5).
NOTE:
A DB9 Male to DB9 Female extension cable may be used from the CSC DB9
connector on the power-data cable to reach the 9-pin serial connector on the CSC.
25. Connect the CSC DB9 connector to the 9-pin serial communications port on the CSC.
26. Follow the steps included in the Wireless Matrix MBS2-LP System Verification List section
of this guide.
Wireless Matrix MBS2-LP System Verification List
To verify the Wireless Matrix MBS2-LP System is operational; follow this checklist:
1. Move the vehicle to an area where there are no obstructions to the southern exposure for the
Wireless Matrix MBS2-LP.
2. Check the cable connections going from the CSC to the Wireless Matrix MBS2-LP and verify
they are securely connected.
3. Verify the power source output is 11 to 16 volts.
4. Attempt to send a message to the host or have the host send a message to the vehicle.