
User's Manual

Document Number 050-015-008R05
Wireless Mmatrix Proprietary and Confidential 8/20
Installation Instructions
The following instructions explain the processes for installing the COMMUNICATOR
1000, antennas, and power cable. The installation process may vary slightly if the
vehicle’s design or accessories will not permit the execution of the steps outlined below.
The process will also vary depending on the type of antenna and the location of the
COMMUNICATOR 1000. Antennas may be adhesive or magnetic-mounted to the roof
with cabling routed through the door or drilling may be required to fasten them on.
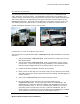
Typical installations includes trucks or service vans
Communicator 1000 Installation Procedures
The average time for the Wireless Matrix COMMUNICATOR 1000 installation is less than
one hour.
1. The Wireless Matrix COMMUNICATOR 1000 should be mounted in a dry and
protected location
2. The Wireless Matrix COMMUNICATOR 1000 is mounted by using 4 screws
into its base. To prevent damage during installation, care should be taken
that the thread engagement of the mounting bolt be 1/2-inch or less.
3. Locate the desired installation location on the vehicle.
4. Place a piece of duct tape over the area to drill, for the antenna mount bolts
and cable access (this will prevent the drill bit from sliding and damaging the
interior surface).
5. Secure the COMMUNICATOR 1000 in place using 4 screws.
6. Plug in the black power connector on the power cable into the
COMMUNICATOR 1000. Connect the power input to the BATTERY+ and
IGNITION wires under the dashboard. Attach the GROUND wire with a zip
screw (grounding screw, # 8 x 1/2”, stainless steel machine) to a metal
grounding point convenient for servicing, under the dashboard. Use an
existing power connection from previous GPS system installations if possible.
If not, solder the connections using the following procedures: