
User's Manual
FCCUM99725
March 15, 2000
Rev -
5
To turn the unit on, press the power key. To turn the unit off, press the power key again.
Note that during operation the power off function is disabled until the allotted time has
elapsed or enabled by the base station.
2.4 Remote Operation.
The remote units operate in concert with the base station,
therefore the base station must be powered on and communication established with the
server prior to remote activation. When the remote user turns on the unit the device
requests the user to enter his or her personal User Identification (ID) and password using
the virtual keyboard display. Upon completion of this information , the ID and password
are sent to the server. Upon recognizing the user the server will pass back the options the
user is assigned. The user then scrolls the list of options and selects the appropriate one.
Once the option is selected, the server sends the selected items to the user.
Periodically the Base station will poll the devices and collect information. The
information entered by the user will be retrieved and temporarily stored by the base
station. In addition, information about the user and the device number the user is
operating can be displayed on the personal computer display.
When the user has completed the operation, the user will command the remote to deliver
any remaining or updated information to the Base Unit. This information will be passed
through to the master server for immediate evaluation. Once the information is processed
by the master server, the administrator will have the ability to sign on directly to the
master server to review results on-line and/or print reports.
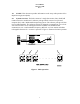
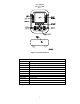
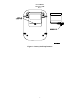
2.5 Battery Charging.
The remote units are shipped with battery packs installed but
uncharged. The battery charger is capable of bringing a battery pack from completely
discharged to fully charged in approximately 3 hours. The remote utilizes NiMH batteries
in a 3 cell configuration. The remote provides a low battery indication when the batteries
reach 20% of capacity. Battery life is dependent upon operator use. The battery charger
is connected to the remote with a two-foot cable. One end of the cable has a 3 pin
connector which inserts into the battery charger. The other end of the cable has a single
prong audio jack connector which is inserted into the bottom of the remote. The remote is
not powered on during charging. While charging the battery charger will illuminate a red
LED. When charging is complete the green LED will illuminate and the red LED will
extinguish. The battery charger and cable are shown in Figure 5.