Wine Cellar Cooling Systems Humidifier Installation, Operation and Maintenance Guide Manufactured by: www.wineguardian.com Syracuse, NY www.airinnovations.com Wine Guardian reserves the right, without notice, to make changes to this document at its sole discretion. Please visit out web site for the most current version of the Wine Guardian manual and other literature. Wine Guardian is a registered trademark (2,972,262) of Air Innovations, Inc.
TABLE OF CONTENTS Directory of Terms ...................................................................................... 2 Introduction ................................................................................................. 3 Receiving, Unpacking and Inspection .......................................................................... 3 General Description .................................................................................... 4 Size and Capacity ..................................
Directory of Terms Ambient – the area outside the cellar. Could be another room, a basement, garage or outside. BTU/H – British Thermal Unit per Hour is a unit of heat measurement. For example, one ton of cooling equals 12,000 BTU/H. Cellar – cubic feet per minute. Unit of measurement for the amount of air being handled by fan. Condensate/Condensation – the water formed out of the air when it is cooled below a certain temperature (called dew point).
Introduction Dear Customer: Congratulations and thank you for purchasing a Wine Guardian® Humidifier. We believe it to be the best wine cellar humidifier on the market and hope that you will agree. This guide is intended to help the installer and owner of the Wine Guardian Humidifier to properly install and maintain the equipment. In order to ensure optimal performance, the equipment should be installed properly and have proper care and maintenance.
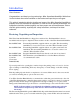
General Description The Wine Guardian Humidifier is a self-contained unit designed specifically for wine cellars. It has been designed for easy installation and operation, either as a freestanding unit or mounted on a Wine Guardian cooling unit. Wine Guardian uses a humidistat to sense and control the amount of moisture needed to be added to the cellar. Humidifiers are not intended to remove moisture, only add moisture. All components are of a high quality, standard commercial grade.
CAUTION CAREFULLY FOLLOW THE INSTALLATION INSTRUCTIONS INCLUDED WITH THE HUMIDIFIER. REFER TO THE MANUFACTURER’S INSTRUCTIONS CONTAINED IN THE BOX FOR THE HUMIDISTAT. WE RECOMMEND YOU KEEP THESE INSTRUCTIONS IN A FOLDER ALONG WITH THIS GUIDE FOR FUTURE REFERENCE. Size and Capacity The Wine Guardian Humidifier uses a 10” wide x 11” high x 2” thick expanded coated aluminum pad. Its rated output capacity for wine cellars is 60°F and 50%RH is 1.6 gallons per day (gpd) with 60°F water supply, 3.
Dimensional Drawing (All dimensions in inches) 6
Cut Away for Freestanding Humidifier 7
Wiring Diagram - Integrated Humidifier Figure 3.
Wiring Diagram - Freestanding Humidifier Figure 3.
Safety The Wine Guardian Humidifier uses 24-volt power through a 120-volt transformer plug or digital control through the Wine Guardian main control unit. CAUTION BE SURE TO DISCONNECT THE MAIN POWER TO THE COOLING UNIT OR TO THE HUMIDIFIER. THE POWER PLUG OR COMMUNICATION CABLE SHOULD BE DISCONNECTED AT ITS SOURCE BEFORE SERVICING. CAUTION THE WATER SUPPLY TO THE HUMIDIFER MAY BE HOT. TURN OFF THE HUMIDIFER AND ALLOW THE WATER TO COOL BEFORE SERVICING THE HUMIDIFIER.
Installation with Freestanding Model Stand Alone Humidifier Installation Options Figure 4.
Freestanding Installation 1) Determine where unit will be mounted. a. If wall mounted, use surface mount bracket (71H0572-00-D). Secure bracket to wall. Attach humidifier to the bracket (with drain tube on bottom) using four (4) screws provided. b. If shelf mounted, place humidifier on shelf with drain tube on bottom. You may need to drill a 1” diameter hole in the shelf and route the drain tube through the hole. c. If through-the-wall mounted, frame opening to have studs 16" OC (on center).
Wine Guardian-Mounted (Integrated Installation) NOTE: Integrated humidifiers can be mounted in either of the two side openings of the cooling unit on the cooling or evaporator end only. If a duct connection is in that position, move the duct connection to the top or other side. DO NOT MOUNT THE HUMIDIFIER ON THE CONDENSER END OF THE UNIT. 1) Remove side access panel on the side of the cooling unit where you wish to mount the humidifier.
Attaching Humidifier to Ducted Wine Guardian unit (integrated installation) Location of WG Unit Connection for Communication Cable from Humidifier Figure 6.
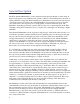
Controller Set-Up Instructions 1. Locate the Wine Guardian remote interface controller within the wine cellar or proceed to the Wine Guardian Through-the-Wall (TTW) main control panel. (Fig. A& Fig. B) 2. Press the mode button and hold it down for five (5) seconds. The screen will advance to the set up menu and "1F" or "Setting #1" will appear on the screen. (Fig. C & Fig. D) Fig. A (TTW) 3. Continue to press the mode button to advance to setup screen "6 0" or "Setting # 6" . (Fig. E & Fig. F.) Fig.
Mounting the Humidistat (Freestanding humidifier only, Part# 99H0185-00) NOTE: Each Wine Guardian Freestanding humidifier comes with a humidistat and humidistat cable pre-wired to unit. 1) Mount the humidistat on a solid surface away from doors, corners, air outlets or other drafty or heat generating equipment. Do not mount directly on an outside wall or wall adjacent to a boiler room. 2) Use a piece of foam insulation behind the humidistat to insulate it from the hot or cold surface.
Maintenance CAUTION BEFORE PERFORMING MAINTENANCE ON THE UNIT, READ AND UNDERSTAND THE SAFETY INFORMATION CONTAINED IN THIS GUIDE. The Wine Guardian Humidifier is designed for minimal maintenance. Never oil any part of the humidifier. Always disconnect the electrical power to the humidifier and the cooling unit prior to servicing. A regular maintenance program prolongs the life of the humidifier and maintains the humidity in the cellar.
Cleaning the Humidifier and Replacement of Evaporative Drip Pad CAUTION BEFORE STARTING WORK, BE SURE THE POWER TO THE WINE GUARDIAN COOLING UNIT AND HUMIDIFIER ARE TURNED OFF. MAKE SURE THE POWER CORD IS DISCONNECTED FROM THE POWER SOURCE. 1) Start by disconnecting the electrical power and shutting off the water supply. 2) Remove the access panel at the back of the humidifier. 3) Remove the drip pad by lifting up on the spring-loaded drip tray.
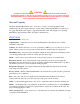
Humidifier Water Line Maintenance (See Figure 8.0) 1) Start by disconnecting the electrical power and shutting off the water supply. 2) Remove front cover of humidifier or remove humidifier from ducted Wine Guardian unit (depending on your set-up). 3) Disconnect the water line at the inlet to the solenoid valve. 4) Remove the in-line strainer from inside the inlet fitting by using a small flat-bladed screwdriver.
Water Line Maintenance Detail Figure 8.
Wine Guardian Warranty Ducted and Humidifier Warranty GENERAL Wine Guardian warrants, to the original buyer, its goods and all parts thereof to be free from defects in material and workmanship for a period of two (2) years from the date of invoicing assuming NORMAL USE AND SERVICE. LIABILITY Wine Guardian liability shall be limited to the repair or replacement (at its option) of any part, which, at our sole discretion, is determined to be defective. The purchaser shall pay all transportation costs.