Xantrex Complete Charge Controller Supplemental Owner’s Manual Rev 1.
Table of Contents Introduction…3 Main Components of the Xantrex Complete Charge Controller…3 Mounting the Xantrex Complete Charge Controller...
Introduction Thank you for your purchase of the Windy Nation’s Xantrex Complete Charge Controller. This Supplemental Owner’s Manual is to be used as a supplemental guide to the Xantrex C-‐Series Charge Controller Owner Manual which is also included with your purchase.
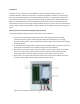
Mounting the Xantrex Complete Charge Controller Use the four mounting holes at the base of the Xantrex Complete Charge Controller to mount the unit to a wall. The controller is designed for indoor mounting. Care should be taken in selecting a location and when mounting the enclosure.
Setting the Voltage and Operating Mode Jumpers for the Xantrex C-‐Series Charge Controller Windy Nation configured the Voltage Jumper for the Xantrex C-‐Series Charge Controller at the factory. (e.g.
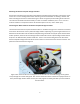
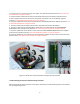
1. Connect your DC current source (PV, wind, hydro, etc.) directly to the RE disconnect. This is the red wire marked “1” in Figure 3 below. 2. Connect another cable from the other side of the RE disconnect to the battery positive terminal. 3. Run a negative wire from the DC current source (PV, wind, hydro, etc.