
manual


10
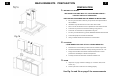
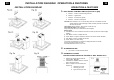
INSTALLATION DIAGRAM
INSTALLATION DIAGRAM
11
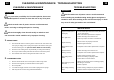
OPERATION & FEATURES
OPERATION & FEATURES
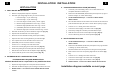
1. ELECTRONIC CONTROL SWITCH (from left to right)
a. Button 1 – Power / 2 minute Delay Shut-off
b. Button 2 – Light Switch
c. Button 3 – Increase Fan Speed
d. Button 4 – Decrease Fan Speed
Turn Off: Press “Button 1” for a 2 minute delay shut-off. A countdown icon will
appear and the screen will begin to flash at which point the unit will turn
off after two minutes.
Turn off Fan: Press “Button 1” twice to turn off the fan only.
Turn on/off the Light: Press “Button 2”
*Only Delay shut-off can turn off both the fan and lights*
Set the Clock
1) Hold “Button 2” for 3 seconds until clock icon show up and hour section begins
flashing.
2) Use “Button 3 and 4” to adjust the hour.
3) Press “Button 2” again to adjust the minutes. The minute section will flash.
4) Use “Button 3 and 4” to adjust the minutes.
5) Press “Button 2” to finish setup.
*If no button is pressed for 5 seconds the display will return to normal*
*Setup can be done when unit is off*
*Clock will dim when hood is not in use*
2. ALUMINUM FILTER
a. (1) 13-5/8” x 11-3/8” aluminum filters
3. CHARCOAL FILTERS
**DO NOT WASH CHARCOAL FILTERS! IT WILL DISSOLVE!!**
a. Replace the aluminum filter with the
charcoal filter. (Fig. 3a)
b. Installation is complete after the charcoal
filter is secured in place.
c. When to replace a charcoal filter will
depend on:
i. How often you cook.
ii. How long you cook.
iii. Types of food you cook