
manual
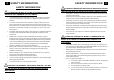


OPERATION & FEATURES
12
4. LED LIGHTS
a. A set of (2) 5W GU10 LED lamp will be included.
b. Additional 5W GU10 LED lamp may be purchased separately.
c. Light sock can accommodate both halogen and LED lamps without the
need to change the transformer.
5. REPLACING LIGHT SET
**NOTE: BE SURE THE LIGHTS ARE NOT HOT
* Use maximum of 5W GU10 LED light bulb*
a. Twist outer light ring counter clock wise with the light key.
b. Outer light ring should drop down along with the light bulb.
c. Slightly pull the light away from the ring.
d. Move light to the left or right of the ring.
e. Twist light bulb counter clock wise to release it.
f. Replace light bulb.
Electrical Shock Hazard
Warning: To avoid electrical shock, replacement GU10 bulbs MUST
contain UL or CSA certification.
**STEP BY STEP DIAGRAM ON NEXT PAGE
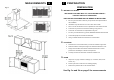
13
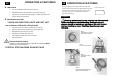
OPERATION & FEATURES
Using the light fixture tool provided, lineup each
corner of the fixture tool in parallel with the notches
located on the outer ring of the light fixture. Twist
the outer ring counter clockwise to unlock the
light fixture housing.
WARNING!!!
Check to make sure all power sources are disconnected
before starting any troubleshooting. Safety gloves and
glasses should be worn when working on the unit. Serious
injury or death may occur if safety precautions are not
followed.
Step 1
Twist light ring counter-
clock wise to unlock.
Step 2
Pull the light upward.
Step 3
Push light to left or
right side.
Step 4
Remove the light by turning
light counter-clock wise
Light Fixture Tool