02-018_9410_Ownersmanual 8/14/02 11:23 AM Page 37 Licensee Winchester Model 9410 Lever Action Shotgun Owner’s Manual
02-018_9410_Ownersmanual 8/14/02 11:23 AM Page 2 Important instructions for Winchester Model 9410 Lever Action .410 Shotgun Customer Service Department (United States) U. S. Repeating Arms Company, Inc. 275 Winchester Avenue Morgan, Utah 84050-9333 Phone: 1-800-945-5237 Winchester trademarks licensed from Olin Corporation. If you have any questions or comments regarding your new firearm, please feel free to write or call us. Use the space below to record information about your new Model 9410 shotgun.
02-018_9410_Ownersmanual 8/14/02 11:23 AM Page 3 Contents Page Gun safety warnings . . . . . . . . . . . . . . . . . . . . . . . . .5 General description . . . . . . . . . . . . . . . . . . . . . . . . .7 Terminology and descriptions . . . . . . . . . . . . . . . . .7 Serial number . . . . . . . . . . . . . . . . . . . . . . . . . . . . . .8 Ammunition . . . . . . . . . . . . . . . . . . . . . . . . . . . . . . .9 General features . . . . . . . . . . . . . . . . . . . . . . . . . . .
02-018_9410_Ownersmanual 8/14/02 11:23 AM Page 4 THANK YOU We sincerely hope that you are pleased with your new Winchester 9410 shotgun. We at U.S. Repeating Arms Company thank you for the privilege of providing this shotgun to you. We are especially proud of the many years of enjoyment it is certain to provide for you and your family. The 9410 is another shotgun in an over 130 year-old tradition of producing quality firearms for the World’s sportsmen.
02-018_9410_Ownersmanual 8/14/02 11:23 AM Page 5 round is chambered keep the safety on until you are ready to shoot. GUN SAFETY WARNINGS IT IS ESSENTIAL THAT THESE OPERATING INSTRUCTIONS BE THOROUGHLY STUDIED BEFORE USING THIS FIREARM TO ASSURE PROPER AND SAFE GUN HANDLING. FAILURE TO FOLLOW THESE INSTRUCTIONS OR FAILURE TO OBEY ANY SAFETY WARNING MAY RESULT IN INJURY TO YOURSELF OR OTHERS, OR CAUSE DAMAGE TO YOUR GUN. 2. Do not rely on the safety to prevent accidental discharge.
02-018_9410_Ownersmanual 8/14/02 11:23 AM Page 6 14. Never alter any parts of your gun. Any alterations or adjustments that may become necessary to the operating mechanism should be performed by a qualified gunsmith. 8. Keep barrel, chamber and action free of rust. Rust in the barrel and chamber can cause excessive pressures resulting in serious injury. A rusted, pitted or eroded barrel should be replaced. 15. Hunting from elevated surfaces such as tree stands is dangerous.
02-018_9410_Ownersmanual 8/14/02 11:23 AM Page 7 — the most famous of all lever action rifles. No gun better represents the Winchester legacy than the Model 94 rifle. Just like the original Model 94 rifles of the past, you’ll appreciate the beautiful craftsmanship and superb function of the your Model 9410. GENERAL DESCRIPTION Congratulations on your purchase of a Winchester Model 9410 shotgun — certainly one of the most unique and fun-to-shoot guns ever.
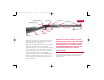
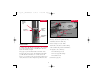
02-018_9410_Ownersmanual 8/14/02 11:23 AM Rebounding hammer Page 8 FIGURE 1A Rear Sight Ejection Port Barrel bands Front Sight Manual hammer stop Loading Port Trigger Guard Forearm Muzzle Magazine Tube Trigger Finger lever Buttstock Butt Plate IMPORTANT: REFER TO FIGURE 1-A FOR GENERAL PART DESCRIPTIONS REGARDING YOUR NEW SHOTGUN. YOU MUST BECOME FAMILIAR WITH ALL PART NAMES LISTED BEFORE PROCEEDING WITH THE REST OF THE INSTRUCTIONS IN THIS MANUAL.
02-018_9410_Ownersmanual 8/14/02 11:23 AM Page 9 FIGURE 1B Pushed to left: off safe FIGURE 1C Manual hammer stop Manual hammer stop Rebounding hammer Pushed to right: “on safe” Trigger stop Trigger Trigger Guard Finger Lever Rebounding hammer restrictions regarding your new Model 9410 shotgun. • Factory .410 bore shotgun shells only. • Chambered for 21⁄2" shells only. • Never attempt to load 3" shells. AMMUNITION • Barrel has a smooth bore with no rifling.
02-018_9410_Ownersmanual 8/14/02 11:23 AM Page 10 MODEL 9410 FEATURES Model 9410 Traditional shown, other models differ slightly. All models are drilled and tapped for scope mounts. With a scope and the proper rifled slug your Model 9410 can be effective for larger varmints — with better results at extended ranges. The manual hammer stop with rebounding hammer gives you an extra margin of safety. The stock is profiled for fast handling and classic good looks.
02-018_9410_Ownersmanual 8/14/02 11:23 AM Page 11 FIGURE 1D The ultra-strong breech block design has stood the test of time and is a main reason for the new Model 9410’s slug shooting accuracy. The handling characteristics of the Model 9410 make it ideal for hunting small game in heavy brush or for use on varmints where there may be very little time to get off a shot at fast moving pests. Every Model 9410 comes with open sights.
02-018_9410_Ownersmanual 8/14/02 11:23 AM Page 12 SHOTGUN. SERIOUS INJURY TO YOURSELF AND OTHERS MAY RESULT. U.S. REPEATING ARMS COMPANY, INC., CAN ASSUME NO RESPONSIBILITY FOR INCIDENTS WHICH OCCUR THROUGH THE USE OF SHOTGUN SHELLS OF NONSTANDARD DIMENSION OR TH OS E TH AT W HEN SHO T, DEV ELO P PRESSURES IN EXCESS OF INDUSTRY STANDARDS ESTABLISHED BY THE SPORTING ARMS AND AMMUNITION MANUFACTURERS’ INSTITUTE (SAAMI).
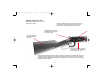
02-018_9410_Ownersmanual Lightly oil the action at these points 8/14/02 11:23 AM Page 13 OILING THE ACTION FIGURE 2 Before the first firing of your Model 9410 you should first wipe the mechanism completely clean, clean the bore and apply a few drops of quality oil on the following surfaces (Figure 2): • Along the breech bolt surface. • On each side of the vertical locking lug on the top and bottom. • Along the breech bolt rail surfaces. Avoid applying too much oil. Only a light film is necessary.
02-018_9410_Ownersmanual 8/14/02 Rebound position of hammer 11:23 AM Page 14 been pulled with the hammer cocked. The hammer then automatically moves to the rebound position. FIGURE 3 THE REBOUND POSITION IS CONSIDERED THE "SAFETY" POSITION. IT IS THE RECOMMENDED POSITION OF THE HAMMER AT ALL TIMES AND SHOULD BE IN THAT POSITION EXCEPT (1) WHEN FIRING IS IMMINENT (2) OR IMMEDIATELY AFTER THE ACTION HAS BEEN CYCLED. FIGURE 4 Cocked position of hammer. 2. Cocked position.
02-018_9410_Ownersmanual 8/14/02 11:23 AM Page 15 FIGURE 5A FIGURE 5B Hammer stop in “on” (safe) position Hammer stop in off (fire) position THIS IS THE RECOMMENDED POSITION OF THE HAMMER FOR ALL TIMES EXCEPT WHEN FIRING IS IMMINENT. finger fully to the left until the red ring is showing. The manual hammer stop can be actuated with the hammer in the rebound or cocked position. “Off” Position. When the hammer stop is pushed all the way to the left it is in the “off” position (Figure 5-B).
02-018_9410_Ownersmanual 8/14/02 Firmly hold the hammer back 11:23 AM Page 16 FIGURE 6A FIGURE 6B Remove your finger from the trigger and lower the hammer to the rebound position Be extremely careful! When wearing gloves, a portion of the glove may get between the lever and the lower tang preventing the lever from depressing the trigger stop — making it necessary to squeeze upward on the finger lever. thumb on the hammer and firmly hold the hammer back slightly with your thumb (Figure 6-A). 3.
02-018_9410_Ownersmanual 8/14/02 11:23 AM Page 17 SAFE DIRECTION. FAILURE TO FOLLOW THE ABOVE INSTRUCTIONS COULD RESULT IN INJURY OR DEATH TO YOURSELF OR OTHERS. FIGURE 7 Trigger Stop ASSEMBLY / DISASSEMBLY Your Model 9410 comes fully assembled in the box. No assembly to the gun itself is required. No disassembly is required for normal maintenance.
02-018_9410_Ownersmanual 8/14/02 11:23 AM Page 18 GENERAL OPERATION 2. Each mount comes in two pieces. Remove the mount caps (top parts) and fasten the mounts (bottom parts) to the top of the receiver. (You may want to apply a removable locking compound to each screw to assure they stay secure under the effect of recoil). The mount with two holes parallel to the receiver is mounted on the front of the receiver. The mount with holes side by side (perpendicular to the receiver) mounts at the back.
02-018_9410_Ownersmanual 8/14/02 11:23 AM Page 19 LOADING PROCEDURES FIGURE 8 USE THE CORRECT AMMUNITION AS INDICATED BY THE INSCRIPTION ON THE BARREL. AS EXPLAINED PREVIOUSLY, BEFORE LOADING YOUR SHOTGUN MAKE SURE ALL GREASE AND OIL HAS BEEN REMOVED FROM THE BARREL AND CHAMBER, AND THERE ARE NO OBSTRUCTIONS IN THE BARREL OR ACTION AREAS. Loading directly into the chamber LOADING THE CHAMBER — The chamber may be loaded two ways: shell.
02-018_9410_Ownersmanual 8/14/02 11:23 AM Page 20 FIGURE 9 FIGURE 10 Insert the shell through the loading port Working the finger lever Loading a shell from the magazine total shell capacity by one; in the case of the Model 9410 Traditional model, nine in the magazine and one in the chamber. If you open the action to load directly into the chamber with the magazine already loaded it may be difficult or impossible to close the action.
02-018_9410_Ownersmanual 8/14/02 11:23 AM Page 21 1. With the gun pointed in a safe direction and your finger off the trigger, swing the finger lever downward fully. This will extract any shell from the chamber and eject it. Capture (or pick up) the shell and return the finger lever fully upward. FIGURE 11 Cover closed 2. Proceed to operate the finger lever in the same manner transferring all the remaining cartridges from the magazine to the chamber and then eject them out.
02-018_9410_Ownersmanual 8/14/02 Carefully inspect the chamber and feed/magazine mechanisms for any shells 11:23 AM Page 22 1. Close the action, returning the shell back into the magazine tube. You may have to work the lever a bit to move the crimp end of the shell past the cartridge stop if it hangs up slightly. Pushing down on the crimp end of the shell with your finger while closing the action with your other hand may also release it and allow the shell to return back into the magazine tube.
02-018_9410_Ownersmanual 8/14/02 11:23 AM Page 23 FIGURE 13 FIGURE 14 Use your finger to push the cover in and hold it there. Pry the rim of the shell up onto the spring cover. under warranty, it must be serviced by a U.S. Repeating Arms Company, Authorized Repair Center (ARC). IN THE CASE OF A MISFIRE Only rarely will modern factory ammunition experience a misfire. If this ever happens to you when shooting your Model 9410 please follow these instructions carefully.
02-018_9410_Ownersmanual 8/14/02 11:23 AM Page 24 FIGURE 15 Pushing the hammer stop off with your finger Cocking the hammer to fire FIGURE 16 Top view With a loaded shell in the chamber, the manual hammer stop in the “on” position, the hammer in the safety (rebound) position and your finger off the trigger: positioned between the hammer and receiver. The hammer block prevents the hammer from striking the firing pin until you pull the trigger to fire the shotgun. 1.
02-018_9410_Ownersmanual 8/14/02 11:23 AM Page 25 SIGHT ADJUSTMENTS FIGURE 17 Push the hammer stop from left to right to the “on” (safe) position All Model 9410 shotguns are fitted with open sights. The style and adjustment system may vary between models and grades.
02-018_9410_Ownersmanual 8/14/02 11:23 AM Move the elevator forward to shoot lower, rearward to shoot higher. Page 26 FIGURE 19 FIGURE 18 Sight elevator Tap carefully. Do not mar the barrel or sight. Lift up on the blade holder gun shoot lower is just the opposite — move the elevator forward. Remember: • Move the blade and holder UP to shoot HIGHER. • Move the blade and holder DOWN to shoot LOWER. • Move the rear sight to the RIGHT to shoot farther to the RIGHT on the target.
02-018_9410_Ownersmanual 8/14/02 11:23 AM Page 27 SIGHT MAINTENANCE — SIGHT PICTURE — Occasionally check your sights to make sure they have not been jarred or vibrated out of adjustment. This is especially important after extensive shooting or after hunting under rugged conditions. If so equipped, check the two screws holding the rear sight blade in place on the blade mount and carefully tighten if necessary. Check the screw holding the front sight base to the barrel.
02-018_9410_Ownersmanual 8/14/02 11:23 AM Page 28 HAMMER EXTENSION FIGURE 21 Some Model 9410 rifles are supplied with a hammer extension. A hammer extension is useful when a scope is mounted. It extends to the side, making it convenient to cock and lower the hammer even with a low-mounted scope. Insert the threaded end into the threaded hole and tighten The hammer extension can be used in either the right hand or left hand position.
02-018_9410_Ownersmanual 8/14/02 11:23 AM Page 29 FIGURE 23 FIGURE 22 Remove magazine end cap 3 shot adapter inside magazine point the end of the magazine away from your face and in a safe direction. Never look directly down into the cap end of the open magazine. 4. Place the three shot adapter inside the magazine spring coils with the flared end of the adapter resting on the top coil. (Figure 23). ALWAYS WEAR EYE PROTECTION WHEN REMOVING AND INSTALLING THE MAGAZINE’S THREE-SHOT PLUG. 5.
02-018_9410_Ownersmanual 8/14/02 11:23 AM Page 30 FIGURE 25 FIGURE 24 Tilt magazine tube away from barrel while keeping pressure on end cap. Turn sling swivel stud counterclockwise to loosen. 4. Remove the three-shot adapter from the spring (Figure 23). remove the magazine end cap from the magazine by tilting the magazine tube away from the barrel enough to clear the sling post mounting stud on the barrel. Remember, magazine is under spring load. (Figure 25.) 5.
02-018_9410_Ownersmanual Flat spot of end cap faces away from barrel. 8/14/02 11:23 AM Page 31 ADAPTER REMOVAL, MODEL 9410 PACKER — FIGURE 26 1. Remove the two screws on the front of forearm cap using a standard screwdriver. 2. Pass a small screwdriver through the hole in the sling post found on the end of the magazine tube. Turn the post counter clockwise to loosen the post. (Figure 24.) 3. Slide forearm cap forward on magazine tube.
02-018_9410_Ownersmanual 8/14/02 11:23 AM Page 32 To clean your firearm, follow the general outline that follows: 9. Replace sling post through magazine tube and end cap. Carefully install sling post making sure the largest part of the sling post is properly installed and passes through hole in magazine tube. Failure to do so will cause damage to magazine tube. CLEANING PROCEDURES — BE CERTAIN YOUR GUN’S CHAMBER AND MAGAZINE ARE UNLOADED.
02-018_9410_Ownersmanual 8/14/02 11:23 AM Page 33 6. INSPECT THE BARREL AND CHAMBER. TO MAKE CERTAIN THAT NO PATCHES HAVE BEEN INADVERTENTLY LEFT IN THEM. Remove any that remain. If or when fouling should become heavy, it can be removed with a brass bore brush. Dip or spray the brush with solvent and scrub the chamber and bore until the fouling is removed. To prevent brass bristles from breaking off, the brush should be pushed completely through the bore before being withdrawn.
02-018_9410_Ownersmanual 8/14/02 11:23 AM Page 34 GENERAL PRODUCT AND H ISTORICAL Q UESTIONS This is a specialized, finely fitted mechanism. You may permanently mar it by attempting to disassemble the inner mechanism assemblies. If further disassembly for service or cleaning is required, take your gun to a U. S. Repeating Arms Company Authorized Repair Center or a competent gunsmith as explained under “Service or Repair.
02-018_9410_Ownersmanual 8/14/02 11:23 AM Page 35 WINCHESTER-GUNS.COM NOTES U.S. Repeating Arms Company offers an information resource for you on the world wide web. • List of authorized repair centers. • Customer service information. • Answers to many technical and historical questions. • Links to helpful sites. • On-line catalog www.winchester-guns.
You Are Responsible For Firearms Safety. As a gun owner, you accept a set of demanding responsibilities. How seriously you take these responsibilities can mean the difference between life and death. Failure to follow any of these instructions can cause extensive damage to your gun and/or possible serious injury or death to yourself and others. There is no excuse for careless or abusive handling of any firearm. At all times handle any firearm with intense respect for its power and potential danger.
7. BEWARE OF BARREL OBSTRUCTION. Do this for the safety of both your gun and yourself. Mud, snow, and an infinite variety of other objects may inadvertently lodge in a barrel bore. It takes only one small obstruction to cause dangerously increased pressures that can ruin (swell or rupture) the finest shotgun barrel. BEFORE CHECKING FOR A BARREL OBSTRUCTION, BE CERTAIN YOUR FIREARM IS FULLY UNLOADED. Make sure no live rounds are in the chamber.
12. USE SHELLS OF CORRECT LENGTH. The size of the chamber is inscribed, along with gauge and choke designations, on the side of the barrel. Do not use 31/2" shotgun shells in a shotgun or barrel with a 2 3/4" chamber or 3" chamber. Do not use 3" shells in a shotgun chambered for a 2 3/4" shells. Doing so can result in a build-up of dangerously high pressures that may damage your gun and possibly cause serious injury to yourself or others. 13.
22. SUPERVISE AND TEACH FIREARMS SAFETY TO ALL MEMBERS OF YOUR FAMILY -ESPECIALLY TO CHILDREN AND NONSHOOTERS. Closely supervise newcomers to the shooting sports. Encourage enrollment in hunting/shooting safety courses. 23. NEVER DRINK ALCOHOLIC BEVERAGES OR TAKE ANY TYPE OF DRUGS BEFORE OR DURING SHOOTING. Your vision and judgment could be dangerously impaired, making your gun handling unsafe to you and to others. 24. PERFORM PERIODIC MAINTENANCE -- AVOID UNAUTHORIZED SERVICING.
02-018_9410_Ownersmanual 8/14/02 11:23 AM Licensee U.S. Repeating Arms Company, Inc. 275 Winchester Avenue Morgan, Utah, U. S. A. 84050-9333 www.winchester-guns.com Winchester trademarks licensed from Olin Corporation.