
Owner`s manual


ie scene with which you are familiar.
•Playtheselectionandlistenfortheintegrationwiththemainspeakers.As
the audio moves across the three front speakers, listen for a smooth tran-
sition from one speaker to the next. You should not hear any voids in the
sound stage.
•Make1/2”changesinfronttobacklocationuntilyoufindtheCenterchan-
nel location that offers the best integration.
Image Height
Check the image height. Does the dialogue of a movie have the correct height? Is it
too low or too high?
If needed, adjust the amount of rotation until the image height is correct. On a stand
or floor mounted Center channel, raising the front spikes will raise the image height; lower-
ing the front spikes will lower the image height. Where possible, we recommend that you
add or remove a spacer to get the correct image height. This will allow the PDC to be reset
using the tables in Section 10.
Center Rotation
Our testing has shown that a
stand-mounted Center channel, at lis-
tening distances greater than 2-3 me-
ters, requires the front of the Center
channel to be raised about 1”. This is
because the effects of comb-filtering
are more noticeable the further you
are away from the Center channel.
This comb-filtering reveals itself as a
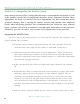
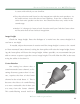
Fi gu re 20 – SPike ASS eMb ly: di Ode nO SPACe rS
SpiKe
nut
diOde
3/4” Set
Screw
S e C T i O n 5 . 3 — i n T e g r a T i n g T H e W a T C H S y S T e m
65
Wilson Audio Specialties