
Owner`s manual
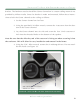

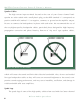


are angled to reduce pressures on the cable during installation. Avoid the instinct to push
the cable’s spade lug ends all the way into the Center channel’s connectors (see Figure 17).
Partial insertion of these angled spade lugs will actually improve the reliability of the con-
nection. Flat lugs may be fully inserted to connectors before tightening.
Connection of the Center to the Power Amplifier
1. Turn off the power amplifier(s) and remove the AC power cord from the wall
outlet.
2. Lay out the speaker cables before hooking them up to the Center channel.
Make sure that there are no kinks, twists, or right-angled bends in the cable.
If you need to turn corners, attempt to use a gradual curve as opposed to a
severe right-angled bend.
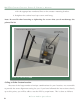
3. Connect the negative (normally black) end of the speaker cable to the high
current speaker binding post with the engraved “-” above it (see Figure 18).
Note: Do not overtighten the binding posts. Overtightening can cause the posts
to break off.
4. Connect the positive (normally red) end of the speaker cable to the high cur-
rent speaker binding post with the engraved “+” above it.
5. Plug your amplifier(s) AC power cord into the wall outlet.
Note: Always attempt to keep your set (LRC) of speaker cables the same length. This will
ensure that the signals arrive at each speaker in the proper time frame, by traveling the
same distance to each speaker.
Center Channel Setup Completed
This completes the initial setup of you Center channel. Final system tuning and voicing
should be performed as outlined in Section 5. Section 5 will evaluate your entire speaker
setup and allow you to make small modifications in speaker rotation and location that will
greatly improve the performance of your multi-channel audio or home theater system.
S e C T i O n 4 . 9 — C O n n e C T i n g S P e a k e r T O a m P l i f i e r
57
Wilson Audio Specialties