
Owner`s manual


bracket. The hardware used to install the Center channel on its custom ceiling mount is not
provided by Wilson Audio. Once the bracket is made and mounted, follow these instruc-
tions to bolt the Center channel to the ceiling as follows:
1. Set the Center channel on the floor.
2. Using the provided 3/16 Allen wrench, remove the 4 setscrews from the bot-
tom of the Center channel.
3. Lay the Center channel onto its side and screw the four 3 inch setscrews 1
inch into the threaded holes on the bottom of the speaker.
Note: Be sure that the Allen key end of the setscrew is facing out when screwing it into
the enclosure. This will allow for easy installation and removal in the future.
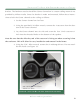
4. Using the 5/32” Allen wrench, remove the 2 midrange drivers. Do not unsol-
der the leads (see Figure 13).
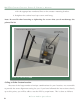
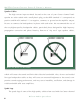
hex Key end Of
SetScrew
3/8 – 16 nut and lOcK waSher.
tighten until Snug
Fi gu re 15 – inSTAlli ng nuT An d lOC k WA SHe r FrO M T He inSid e
S e C T i O n 4 . 7 — S e T u P # 4 C e n T e r m O u n T e d T O C e i l i n g
51
Wilson Audio Specialties