
Owner`s manual
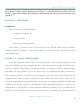

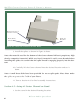


2. Attach the spikes to the bottom of the stand by screwing the spike and nut
combination until the nut is flush with the bottom (See Figure 11).
Note: Do not tighten the nut at this time. Wait until the fine-tuning has been completed
for the entire system and the speaker has been leveled.
Note: Four small brass disks have been provided for use as spike pads. Place these under
the spikes to protect the finish of your floors.
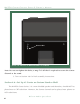
3. Using provided 3/16 Allen wrench, remove the 4 setscrews from the bottom
oftheCenterchannel.Keeptheseastheyarethesetscrewsneededtoas-
semble your spikes and may be required during final setup.
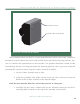
4. Bolt the Center channel to the stand using the four 3/8 – 16 threaded socket
head cap screws and washer provided (see Figure 11).
Fi gu re 11 – inSTAlli ng THe Ce nTer CHA nne l STAnd SP ike S
threaded SpiKeS
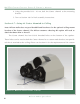
S e C T i O n 4 . 5 — S e T u P # 2 C e n T e r C H a n n e l O n S T a n d
47
Wilson Audio Specialties