
Assembly & Installation Instructions

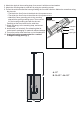

1. Rod Connections:
a. Thread the fixture wire from the fixture through the
lower rod, then secure the lower rod onto fixture using
the threaded pipe.
b. Thread the fixture wire through the middle rod, and
then secure the middle rod onto the lower rod using
the threaded pipe.
c. Thread the fixture wire through the upper rod, and
then secure the upper rod onto the middle rod using
the threaded pipe.
The height can be adjustable to 30-1/2"~84-1/2", by
using the rods.
2. Thread the fixture wire through the collar, coupling kit,
canopy, then secure the rod assembly to the coupling kit.
3. Thread the fixture wire through the nipple, hex nut and
mounting strap. Install the hex nut onto one end of the
nipple leaving about 3/8” (10mm) thread exposed. Install
same end of nipple by screwing into coupling kit, secure
nipple by tightening hex nut.
Collar (H)
Canopy (J)
Outlet Box
House Grounding Wire
Wire Nut (E)
Nipple (C)
Mounting Strap (A)
Green Grounding Screw (F)
Hex Nut
Mounting Screw (D)
Upper Rod
Middle Rod
Lower Rod
Threaded Pipe
Threaded Pipe
Fixture Wire
ASSEMBLY AND INSTALLATION
INSTRUCTIONS
WARNING: BE SURE TO SHUT OFF POWER AT THE MAIN FUSE OR CIRCUIT
BREAKER BOX BEFORE INSTALLING OR SERVICING THIS FIXTURE.
NOTE: 1. Before installing, consult local electrical codes for wiring and grounding requirements.
2. READ AND SAVE THESE INSTRUCTIONS.
Bulb Type B Max.60W
(Not Included)
Coupling Kit (G)
Fixture Grounding Wire
Hex Nut (B) & Washer (I)
Threaded Pipe
Socket
Set Screw
Parts:
Mounting Screw (D)
Hex Nut (B)
Wire Nut (E)
Mounting Strap (A)
Nipple (C)
Green Grounding
Screw (F)
Coupling Kit (G)
Collar (H)
Washer (I)
Fixture
12”Rod (K) (X4)
6”Rod (L) (X1)
Canopy (J)
3”Rod (M) (X1)