OF 6
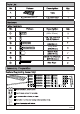
Short Bolt (M8 x 20mm) Middle Bolts Long Bolts 2 OF 6
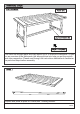
This Table has multiple parts and may require up to 30 minutes to assemble. To give you an overview of the table parts, the above picture is to help you put the various parts into perspective. Please read through the instructions herebelow to familiarise the parts and steps before assembly. Unpack and place all parts on a clean,non - marring surface.
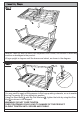
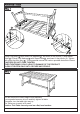
Place the Table (A) with the fabric face skywards onto a clean, soft surface to avoid any scratches or damages to the product. Lift legs upright in degrees until the braces are locked, as shown in the diagram. 7 1 2 Attach the Leg Connector (B) to the Table(A). You may need to apply a little pressure to the Legs-pushing outwards, so as to enable the leg Connector (B) to be slotled into position.
4 3 Using Long Bolts ( ) with Small Flat Washers( ), as shown in the picture (1) and Middle Bolts ( ) & Small Flat Washers( ) with Sleeve Nuts( ), as shown in the picture (2). Tighten with using the Allen Key ( ). This sequential manner will reduce possible distortion of frame. CAUTION!! DO NOT OVER TIGHTEN. OVER TIGHTENING COULD LEAD TO DAMAGE OF THE PRODUCT. SLOWLY TIGHTEN ONLY UNTIL SECURE AND STABLE. You are now at the FINAL stage of this assembly.
Care & Maintenance Do not put hot items directly on furniture surface. Do not clean furniture with harsh cleansers or polish. ü To obtain the longest lifespan of your outdoor products, minimizing exposure to direct sunlight is recommended. Children should not climb or jump on the furniture. Do not write on furniture without a padded barrier to protect the surface. ü To obtain the longest lifespan of your outdoor products, avoid extended and lengthy exposure to rain, snow, and direct sunshine.