
Installation guide

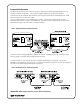
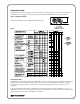

Conguration Settings
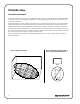
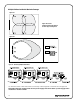
Figure 8
Figure 7: Conguration Switches
Compressor Gain
IMPORTANT: Channel A and Channel B must be set to different frequencies!