
Installation Instructions


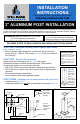
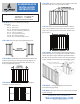
Table Of Contents

Suggested Tools: Cordless Drill Pencil
Tape Measure #2 Sq. Driver Bit
Safety Glasses 1/8” Drill Bit
Miter Saw w/ Non-Ferrous Blade
STEP ONE: Remove all items from package.
Kit Includes:
One (1) - Picket Panel
Two (2) - Snap Covers
Two (2) - Gate End Posts w/ Welded Rods
Sixteen (16) - 3/4” Self Tapping TEK Screws
Two (2) - Self-Closing Hinges
One (1) - Locking Latch Kit w/ Key
Four (4) - Gate Support Brackets
Sixteen (16) - Color Matched TEK Screws
STEP TWO: Measure gate opening between posts.
STEP THREE: Picket Gate Panel (without Gate End Posts)
must be exactly 4.5” less than gate opening. Deduct 4.5”
from opening measurement and cut both panel ends,
leaving equal picket spacing.
STEP FOUR: Insert Gate End Posts into panel upper
and lower horizontal channels.
STEP FIVE: Drill 16 - 1/8” holes as per diagram and install
3/4” TEK screws to secure gate ends to panel.
STEP SIX: Measure between Gate End Posts, deduct
1/16”, cut top/bottom snap covers. Once cut, position
snap covers over top/bottom horizontal channels and
press in place.
STEP NINE: Install gate latch as per instructions provided
in latch package.
STEP SEVEN: To install Support Bracket, rst attach
Support Bracket to Post using 2x #8 x 3/4” TEK screws as
shown, then press Support Bracket against Horizontal
Rail, drill 2x 1/8” pilot holes and secure using remaining
2x #8 x 3/4” TEK screws. Repeat for remaining brackets.
4x #8 3/4” Colored Matched TEK
screws per support bracket
4x Support
Bracket
Horizontal Rail
Post
STEP EIGHT: Install gate hinges per instructions
provided in hinge package.
ALUMINUM GATE
INSTALLATION
INSTRUCTIONS
©2018 WES, LLC. All Rights Reserved. Version 2.1
Installation Videos available at:
WILLIAMSRAILING.COM