
Installation Instructions


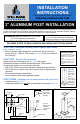
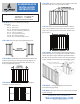
Table Of Contents

Rest jig on
Base Plate –
Arrow Down
Place Clip in
hole, hold clip
rmly while
installing (2)
TEK Screws.
Dia. #1
2
5
/
16
"
Option B - Using Lower
Rail Clip Jig
• Place lower rail clip jig
(w/arrow facing base
plate) on top of base
plate upper edge.
(Dia. #2)
• Place clip in hole and
fasten with (2) - #8x3/4"
TEK screws.
STEP ONE – Determine necessary posts
required and prepare (end, center or corner)
Install Lower Deck Rail Clips – Two Options:
STEP TWO - Securing Posts to Deck
Install proper post blocking as per (Dia. #3). Use proper
attachment screws or anchors as directed below. (Deck
screws at each post location, are not provided with kits).
• With 3/16" drill bit, pre-drill through deck boards and
into blocking.
• Level and plumb post using shims.
• Secure posts to deck with suggested screws.
• Install post cap and post base vinyl plate cover. (Dia. #4)
STEP THREE - Cut Deck Panels
• Clamp or hold panel against post, adjust for equal
end spacing. (Dia. #5)
• Mark the top and bottom rails.
• Cut panel 1/16" less than opening size.
• Clean cut areas and apply touch-up paint on
exposed ends.
Option A - When No
Lower Rail Clip Jig Is
Available
• Measure 2 5/16" from
top of casting shoulder
and place a pencil mark
for location of the top
edge of the rail clip.
(Dia. #1)
• Center clip on post
and secure with (2) -
#8x3/4" TEK screws.
Dia. #2
Dia. #3
Dia. #4
Dia. #5
FOR OTHER INSTRUCTIONS
AND VIDEOS, VISIT
WWW.WILLIAMSRAILING.COM
Shims
below
base
2x6
Blocking
4X Exterior
Construction
Washer Head
Structural Screws
(sold separately)
Cap
Square Post
Post Base Plate
Vinyl Cover
POST-TO-SURFACE MOUNTING SCREWS:
3" Posts – Residential Deck Applications – GRK
®
RSS
™
5/16" x 6" Grade C Yellow Zinc Washer Head Structural
Screw
3" Posts – Residential Concrete Applications – Tapcon
®
5/16" x 3" Hex Washer Head Concrete Anchor
Deck Edge
3" Centerline
Typical
3" Centerline
Typical
Joist
Stringer
2x6 Blocking
2x6 Cross
Block