
User guide


WML Linux Thin Client User Guide
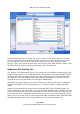
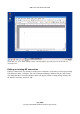
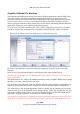
The illustration shows a user choosing “my_ssl_key” which is in the “Home” directory – this user
possibly transferred the file to the thin client using a web browser or the sftp client. To access your
key on a flash drive, you will need to click on the “Filesystem” icon, then choose the “flash”
directory. Click “Open” and the contents of the file will appear in the Public SSL Key window. Close
the Public SSL Key window and proceed with setting up the NX connection.
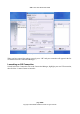
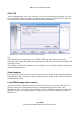
NoMachine NX: Desktop Tab
The “Desktop” Tab (Illustration 20) allows you to choose the type of desktop to launch using the NX
Client. The main choices given are GNOME, KDE, CDE. Most users will choose GNOME or KDE.
To find out more about launching custom sessions and applications, please refer to the Nomachine
documentation – this setup window has the same options as Nomachine's own NX client. Refer to
Nomachine also for more information about setting the XDM Settings.
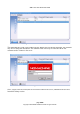
The Window Size option allows you to choose whether your NX session will appear in a managed
window on the WML Linux Thin Client desktop, or as a fullscreen window occupying the entire
display.
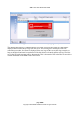
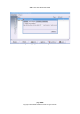
Images are encoded by the NX compression protocol using JPEG, PNG or Xbitmap formats. The
image encoding drop-down menu allows you to specify which should be used, or “Default” will allow
NX to choose based on the speed of the connection, as specified on the Network tab. JPEG offers the
best compression for low bandwidth connections, but as it is a lossy compression format, the image
quality of your screen will not be as good compared with PNG or Xbitmap formats. With JPEG image
encoding, the quality may be chosen. Set the quality to low for the slowest connections.
page 21/62
Copyright © 2008 William Matthew Limited. All rights reserved
Illustration 19: Browsing for an SSL key