
User Manual


20
|
CHAPTER 1 Inventor DesIgn PhIlosoPhy
Using a perspective view may be desirable when viewing the model in a 3D view, but it can
be distracting when sketching on a flat face or viewing the model from a standard 2D ortho-
graphic view because you see what appear to be tapering faces and edges. However, you can get
the best of both projections by setting the ViewCube to Perspective With Ortho Faces so that the
model is displayed in orthographic mode when one of the standard orthographic faces is active
and in perspective mode in any other view. To do this, simply right-click the ViewCube and you
will see the option. Note that this setting is set for each document rather than for the application
itself, so you will typically need to do this for each model.
Most of the tools in the Windows panel are standard controls, such as for switching tiling
windows. If you click User Interface, a list of items such as the ViewCube and the status bar
are displayed. The Clean Screen icon hides most of the UI elements. Only the title bar and a
minimized Ribbon bar are displayed. Although the Clean Screen setting certainly maximizes
your screen real estate, it turns off one very critical interface object, the browser pane. To use
the Clean Screen function effectively, you must turn it back on. To do so, use the User Interface
drop-down and select the Browser option. You can click the small drop-down arrow to the right
of the tabs to display of the tool panels again.
Also on the View tab is a Navigate panel. The tools in the Navigate panel are the same as
those found on the navigation bar, as discussed earlier in the chapter.
Before You Begin…
In the next section, you will be using the tutorial files that accompany the book. Before you begin,
ensure that you have downloaded the files from www.sybex.com/go/masteringinventor2012.
Place the files in a folder on your computer (such as \My Documents\Mastering Inventor 2012),
and then be sure to make the Mastering Inventor 2012 project active:
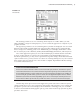
1 . Within Inventor, close any open files.
2 . From the Get Started tab, click the Projects button.
3 . From the Projects dialog, click the Browse button.
4 . From the Choose Project File dialog, browse to the Mastering Inventor 2012 folder, select the
Mastering Inventor 2012.ipj file, and click Open.
5 . Note that the Mastering Inventor 2012 project is denoted as being the active project with a
check mark.
6 . Click Done to close the Projects dialog box.
Now you are ready to get started. You’ll find a more detailed explanation of working with and set-
ting up projects in Chapter 2, “Data and Projects.”
If you are using Inventor LT, you should be aware that it doesn’t make use of project files and there-
fore instructions concerning Inventor project files do not apply.
The Browser Pane
The browser pane (often called the Model browser) is a listing of everything that makes up an
Inventor file. The part browser shows all of the features, the assembly browser shows all of the
components, and the drawing browser shows the sheets with the views. Because Inventor files are
similar to actual parts and assemblies, the browser plays an important role in navigating the files.
016824c01.indd 20 4/29/11 6:56:24 AM