
Datasheet


whole image) to viewing thumb-
nails. The thumbnails can be dis-
played either four images or nine
images on a page.
✦ Zoom in button. When reviewing
your images you can press the
Zoom in button to get a closer look
at the details of your image. This is
a handy feature for checking the
sharpness and focus of your shot.
When zoomed in, use the multi-
selector to navigate around within
the image. To view your other
images at the same zoom ratio you
can rotate the main command dial.
To return to full-frame playback,
press the Zoom out button. You
may have to press the Zoom out
button multiple times depending
on how much you have zoomed in.
✦ OK button. When in the Menu
mode, press this button to select
the menu item that is highlighted.
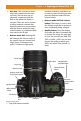
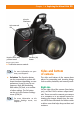
Front of the camera
The front of the D300 (lens facing you) is
where you find the buttons to quickly adjust
the flash settings as well as some camera
focusing options, and with certain lenses
you will find some buttons that control
focusing and Vibration Reduction (VR).
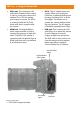
Right front
✦ Built-in Speedlight. This option is
a handy feature that allows you to
take sharp pictures in low-light sit-
uations. Although not as versatile
as one of the external Nikon
Speedlights such as the SB-800 or
SB-600, the built-in flash can be
used very effectively and is great
for snapshots. The built-in flash can
also be used as a commander unit
to trigger Nikon CLS-compatible
Speedlights wirelessly for off-
camera use.
For more on using flash, see
Chapter 6.
✦ Flash pop-up button. Press this
button to open and activate the
built-in Speedlight.
✦ Flash mode button. Pressing this
button and rotating the Main
Command dial on the rear of the
camera allows you to choose a
flash mode. You can choose from
among Front-Curtain Sync, Red-Eye
Reduction, Red-Eye Reduction with
slow sync, Slow Sync, and Rear-
Curtain Sync. Pressing the Flash
mode button and rotating the Sub-
command dial, located just below
the Shutter Release button, allows
you to adjust the flash exposure
compensation (FEC). FEC allows
you to adjust the flash output to
make the flash brighter or dimmer
depending on your needs.
✦ Flash sync terminal cover.
Underneath this rubber cover is the
flash sync terminal. This terminal,
also known as PC sync, allows you
to connect a PC cord to trigger an
external flash or studio strobe.
✦ 10-pin remote terminal cover.
Underneath this rubber cover is the
10-pin remote terminal. This termi-
nal allows the camera to be con-
nected to a variety of accessories.
Some of these include a remote
shutter release cord and GPS
devices. See the Nikon Web site for
more information regarding spe-
cific accessories.
Chapter 1 ✦ Exploring the Nikon D300 21
06_260920 ch01.qxp 3/25/08 1:01 PM Page 21