
Datasheet


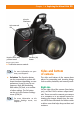

adjust this, look through the
viewfinder, and press the Shutter
Release button halfway to focus on
something. If what you see in the
viewfinder isn’t quite sharp, turn
the Diopter control until everything
appears in focus. The manual
warns you not to put your finger or
fingernail in your eye. I agree that
this might not be a good idea.
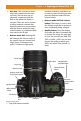
✦ Metering mode dial. This dial is
used to choose the metering
mode. Turn the dial to the desired
mode. You can choose Matrix,
Center-weighted, or Spot metering.
✦ AE-L / AF-L The Auto-
Exposure/Auto-Focus lock button is
used to lock the Auto-Exposure
(AE) and Auto-Focus (AF). You can
also customize the button to lock
only the AE or only the AF.
✦ AF-ON. The Auto-Focus On button
activates the AF mechanism with-
out you having to press the Shutter
Release button. When in Single
focus mode the AF-ON button also
locks in the focus until the button
is released.
✦ Main Command dial. This dial is
used to change a variety of settings
depending on which button you
are using in conjunction with it. By
default, it is used to change the
shutter speed when in Shutter pri-
ority and Manual mode. It can also
be used with the ISO, QUAL, and
WB buttons.
✦ Multi-selector. The multi-selector
is another button that serves a few
different purposes. In Playback
mode the multi-selector is used to
scroll through the photographs
you’ve taken, and it can also be
used to view image information
such as histograms and shooting
settings. When in Shooting mode
the multi-selector can be used to
change the active focus point
when in Single point or Dynamic
area AF mode.
✦ Focus selector lock. This switch
can be used to lock the multi-
selector so the focus point won’t
accidentally be changed. Slide the
switch to the L position to lock the
focus point.
✦ AF area mode selector. This
three-position switch is used to
choose among focus modes. You
can choose Single area AF,
Dynamic area AF, or Auto-area AF.
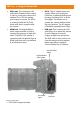
✦ Card slot cover latch. Press this
latch to open the door to access
the CF card when the CF card busy
light is off.
✦ Playback button. Pressing this
button displays the most recently
taken photograph. You can also
view other pictures by pressing the
multi-selector left and right.
✦ Delete button. When reviewing
your pictures, if you find some that
you don’t want to keep you can
delete them by pressing this but-
ton marked with a trashcan icon.
To prevent accidental deletion of
images the camera displays a dia-
log box asking you to confirm that
you want to erase the picture.
Press the Delete button a second
time to permanently erase the
image.
✦ Menu button. Press this button to
access the D300 menu options.
There are a number of different
menus including Playback,
Shooting, Custom Settings, and
Retouch. Use the multi-selector
to choose the menu you want to
view.
Chapter 1 ✦ Exploring the Nikon D300 19
06_260920 ch01.qxp 3/25/08 1:01 PM Page 19