
Datasheet


half-pressed and focus is achieved.
When in Auto-area AF and set to
Continuous focus mode the focus
point is not displayed at all.
✦ Framing grid. When this option is
turned on in the CSM d2, you will
see a grid displayed in the viewing
area. This is to help with composi-
tion. Use the grid to help line up
elements of your composition to
ensure that things are straight (or
not).
✦ Battery indicator. This is another
optional display that can be turned
on in the CSM d3. When this
option is activated, a small battery
icon appears in the bottom-left
corner that displays the approxi-
mate amount of charge that is left
in the battery.
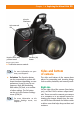
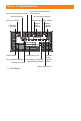
Below the actual image portion of the
viewfinder display is a black bar with LCD
readouts on it. Not only do you find your
shooting information here, depending on
your chosen settings, other useful indicators
appear here as well. From left to right these
items are:
✦ Focus indicator. This is a green
dot that lets you know if the cam-
era detects that the scene is in
focus. When focus is achieved, the
green dot lights up; if the camera
is not in focus, no dot is displayed.
✦ Metering indicator. This display
shows which metering mode you
are in: Spot, Center-weighted, or
Matrix.
✦ AE lock. When this is lit you know
that the Auto-exposure lock button
has been pressed.
✦ FV lock indicator. When the FV
lock indicator is on it means you
have locked in the flash exposure
value. The flash value can only be
locked when the Function button
has been set to do this.
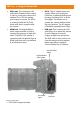
✦ Flash sync indicator. This indica-
tor is displayed as a small X. This
comes on when you set your cam-
era to the sync speed that is set in
CSM e1. This is only available
when in Shutter Priority or Manual
mode. To set the camera to the
preset sync speed, dial the shutter
speed down one setting past the
longest shutter time, which is 30
seconds in S and bulb in M.
✦ Shutter speed indicator. This
shows how long your shutter is set
to stay open.
✦ Aperture / f-stop indicator. This
shows what your current lens
opening setting is.
✦ Exposure mode. This tells you
which exposure mode you are cur-
rently using: P, S, A, or M.
✦ Electronic analog exposure dis-
play.
Although Nikon gives this
feature a long and confusing name,
in simpler terms this is your light
meter. When the bars are in the
center you are at the proper set-
tings to get a good exposure; when
the bars are to the left you are
overexposed; and when the bars
are to the right you are underex-
posing your image. This feature is
especially handy when using
Manual exposure.
✦ Auto ISO indicator. This is dis-
played when the Automatic ISO
setting is activated to let you know
that the camera is controlling the
ISO settings.
✦ FEC indicator. When this is dis-
played your flash exposure
compensation is on.
Chapter 1 ✦ Exploring the Nikon D300 27
06_260920 ch01_2.qxp 7/15/08 1:51 PM Page 27