
Datasheet


16
Part I: The Basics of Color Editing
Understanding channels
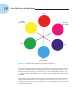
In Photoshop Elements terms, the three hues your monitor displays (red,
green, and blue) are called
channels. You can easily see the three channels by
opening an RGB color image in Standard Edit mode and opening the Levels
dialog box. Select Enhance
➪Adjust Lighting➪Levels or simply press Ctrl+L
(
Ô+L for Macs). When the Levels dialog box opens, click the RGB menu (the
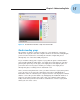
down-pointing arrow), and you see the three channels, as shown in Figure 1-5.
Figure 1-5: In the Levels dialog box, you can access the three RGB channels.
We commonly refer to the RGB channel as the composite channel because it’s
a mix of the different gray levels in all three channels. If you make an adjust-
ment to this channel, all three RGB channels are adjusted together. However,
you can also individually make adjustments to the Red, Green, and Blue
channels.
When we refer to making adjustments to either the composite channel or the
individual channels, we’re really talking about painting that imaginary glass
darker or lighter to allow more or less light to pass through, resulting in more
or less saturated color.
As you work through the chapters in this book, we continually reference tone
levels (represented by the 256 levels of gray) and channels. A slight edit to
the tone levels in either the composite channel or any one of the individual
channels can greatly affect image brightness and color.
05_048924 ch01.qxp 12/22/06 12:16 AM Page 16