
Datasheet


17
■ KNOWING YOUR DIGITAL CAMERA
4. Now open your image with an image-processing program.
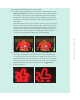
5. Using magnification and navigation tools, zoom into the areas with most detail. Look for
sharpness or lack thereof. For example, look at the image on the left. When magnified it
appears sharp, a result of both good optics and appropriate camera image sharpening.
The image on the right may at first glance look “sharper” than the one on the left. But
it’s actually been oversharpened by camera processing, and upon magnification appears
quite pixelated.
An image that appears soft or out of focus might be a result of poor optics, or it may not.
Many digital cameras apply a slight blur to the image during onboard image processing
to prevent color fringing. Also keep in mind that sometimes what you see as sharpness is
really just increased contrast, again produced by image processing. Don’t panic if your
test image looks too sharp (contrasty) or too soft. Many digital cameras allow you to
select from a variety of sharpness settings. Refer to your camera manual.
6. Now find an area with an abrupt color transition. Look for color fringing, which is often
found at the color transition areas where interpolation can lead to color artifacts and
loss of image detail. The image on the left below, for example, suffers from a lot of color
fringing, while the image on the right displays a more acceptable level of color fringing.
There isn’t much you can do about color fringing except, if possible, save your images in
the RAW data format and process the images outside the camera (
“RAW Data
Revealed,” in Chapter 2).
42877ch01.qxd 9/18/06 11:21 PM Page 17