ASSEMBLY INSTRUCTIONS ASSEMBLY TIPS: 1.Remove hardware from box and sort by size. 2.Please check to see that all hardware and parts are present prior to start of assembly. 3.Please follow attached instructions in the same sequence as numbered to assure fast & easy assembly. A Warning ! 1.Don't attempt to repair or modify parts that are broken or defective. Please contact the store immediately. 2.This product is for home use only and not intended for commercial establishments.
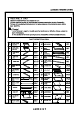
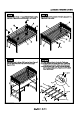
ASSEMBLY INSTRUCTIONS HARDWARE IDENTIFICATION 01 N 40 PCS|| 09 02 misname | & 34PCS| | 10 | sheer supra] 03 | short Bolt 30PCS|| 11 04 PCS || 12 05 borrow W PCs PCS || 14 | woodpile 07 B 14PCS|| 15 08 | setscrew [ 24 PCS|| 16 STEP-1 STEP-2] 1.1 Insert long wood dowel to both end of right middle rail & | Place desk tap an soft surface. Align & fasten left & right lower rail, Then align & fasten right back log & front log hailstorm glider to desk top by using hart bolt.
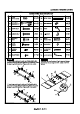
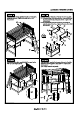
3.1 Insert long wood dowel to back middle rail and back lower rails. 3.2 Align and fasten left and right back leg to back rails as per diagram shown by using long bolt and barrel mut. Tighten with ASSEMBLY INSTRUCTIONS STEP-4 4.1 Align and fasten support leg to left & right glider of desk top by using shortest bolt. Tighten with Allen wrench. 4.2 Align and fasten desk top to middle rails (as per diagram shown) by using medium bolt. Tighten with Allen wrench.
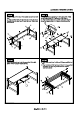
ASSEMBLY INSTRUCTIONS by using Allen cap screw. Tighten with Allen wrench. 10.3 Align and fasten hook to the top of left & right ladder stile by using medium screw. Tighten with screw driver (OT INCL! . 10.1 Insert long wood dowel to both end of ladder step. 10.2 Align and fasten left & right ladder stile to ladder step Insert metal dowel to the top of the lower bed legs. Al Align and fasten roll slat to long guardrail ith s i JOT INCLUDED; place the upper bed end onto the lower bed legs.
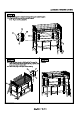
ASSEMBLY INSTRUCTIONS STEP-11 STEP-12 Align and fasten the duly assembled ladder onto bed rail by 12.1 Insert. short wood dowel to bath end of top bottom panel. using medium screw. Tighten with screw driver (NOT 12.2 Align and fasten left & right side panel to top/bottom panel ‘by using short bolt (as per diagram shown). Tighten with Allen wrench. STEP-14 Align and fasten large shelf to the outer side panel of the duly assembled shelf box panel by using short bolt. Tighten with Allen wrench.
ASSEMBLY INSTRUCTIONS STEP-15 15.1 Insert shelf support to the inner left & right side panel of shelf box panel. 15.2 Align and place small shelf onto the shelf support (note : high of shelf's adjustable). STEP-16 16.1 Align and fasten bracket to bed leg & shelf box panel by using medium screw (as per diagram shown). Tighten with screw driver (NOT INCLUDED). 16.2 Insert wood plugs to the upper & lower bed leg.
A GAIA /70770777022, WARNING TO PREVENT SERIOUS OR FATAL INJURY . Whitening beds as bunk beds, the ladder MUST be securely attached tithe upperclassman at all times: 2. When using the beds as twi (2) separate floor-standing beds, the ladder MUST be stored in a separate location where children cannot use the ladder in.any manner, 3. DO NOT use, worry permit children to use, the ladder inane manner whatsoever, other thalami to.