
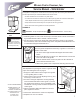
User guide


2
SETTING TIMER
1. Take off timer cover, located behind hopper. Remove the four screws
holding the cover in place. The timer is found inside this cover. Also refer
to the illustrated parts diagram on page 3.
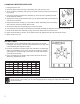
2. The timer controls are a high/low switch and a dial with a corresponding
scale. The switch allows you to select a scale on the dial. The outside
scale range is ½ second through 15 seconds. The inside scale range is
2 seconds to 60 seconds.
3. Test a new adjustment by grinding some coffee. When the results are
satisfactory, reinstall timer cover.
CHANGING A BROKEN SHEAR DISK
1. Unplug the power cord.
2. Open the hopper and remove any coffee beans, then open the front cover.
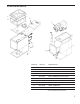
3. On the grind motor assembly, take out the two thumb screws (10) and remove the hous-
ing cover (6).
4. Pull out the grinding burr/feed worm assembly (2). The inner half of grinding burrs will
remain within the housing.
5. Separate the shear cap (5) and shear drive (3). The broken shear disk (4) should fall out
from the slot on the drive.
6. Inspect and clean the housing (1) of any coffee or debris. Especially, look for something
that could have caused the shear disk to break.
7. Re-insert the feed worm and grinding burr on the motor shaft.
8. Push the shear drive through the burr/feed worm assembly and align the large slot with tongue on motor shaft.
9. Rotate the burr/feed worm assembly to align the slot with the narrow slot on shear drive.
10. Slip a new shear disk into the slot. Cover with the shear cap. Replace the grind cap and thumb screws.
11. Return power to the unit.
NOTE: Use these time settings as a general guide. Actual amounts will vary with the grinding burr setting
and the specic coffee variety you use. After changing the timer, weigh your output, then make adjust-
ments if necessary