
User Manual


IMPORTANT-Donotremovepillarstotakeoffmountingplate.
COLD OR HOT?
I. EVERY3-4HOURSORMOREOFTENIFNECESSARY
A. MakesurepowerisON.
B. Placeacontainerunderthedispensespouttocatchtherinsewater.
C. LocatetheWASHbuttononthefrontcontrolpanel.
D. RinseeachavorbypushingandholdingtheWASHbutton,whileatthesametime
pressingoneofthePUSHdispensingbuttonsonthecontrolpanel.Continueholding
WASHuntilthewaterrunningfromthespoutrunsclear.
II. DAILY
A. SwitchOFFtheunitatthepowertoggleswitch,locatedbehindtheunit.
B. Wipeallexteriorsurfaceswithadampcloth,removinganyspills,residueordustfrom
the unit.
C. Removeboththedripdrawerandlouveredscreen;thenwashoutitscontents.For
hardtocleandeposits,useamild,nonabrasivedetergent.Rinsewithwater.
D. Wipeandcleanthedispensingareawithamilddetergentcleaner.
III.WEEKLYORMOREOFTENIFNECESSARY
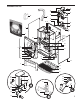
A.Cleanthewhipperchamberunitwithwarmwaterandamilddetergent.
1. Removetheuppermixingcup.
a. Pullcupforward,twisttotheleftandliftittoseparatetheuppermixingcupfromthelowermixingcup.
2. Toremovethelowermixingcup:
a. Pullmixingcupupandforwardtofreeitfromthehotwaterinlettting.
b. Cleanwithamilddishwashingsolution.
3. Removethedispensingnozzlefromthewhipperchamber.Cleantheinsideusinganarrowbrush.
4. Removethewhipperchamber.
a. Takeholdofthewhipperchamber.Turnitclockwisetofreeitfromthemountingplate.
b. Removewhipperchamberfromtheunitandcleanitthoroughly.
5. Pullthewhipperpropellerfromthemotorshaftandcleanit.
CAUTION - Do not use cleansers, liquid bleach, powders or any other substance containing chlorine. These products
promote corrosion and will pit the stainless steel. THE USE OF THESE PRODUCTS WILL VOID YOUR WARRANTY.
2
CleaningtheCurtisPrimoCappuccinoGTBeverageDispenser
OperationInstructions
1.Chooseaavor.Placeyourcupunderthespoutbeneaththedesiredavor.
Note:WhenusingIced Cappuccinomachine,llyourcupwithicebeforedispensingproduct.
2.Pushandholdthedispensingbuttonforthisavor.
3.Releasethebuttonwhenthecupis¾ full.
FILLCANISTERSDAILY
1. Openthefrontdoortoaccesscanisters.
2. Thecanistersmustberemovedfromtheunitforlling.Turnthepowderdeliveryelbowsupward.
Thecanistersholdvepoundsofproduct.Largercanistershold10poundseach.
3. Repositionthecanistersonthemachine,turningthepowderdeliveryelbowsdownwardand
aligningthegearsocketwiththemotorshaft.
c. Cleantheareabehindthemountingplate.
d. Cleanthewaterinlettting.
e. Lubricatethecentersealofthemountingplatebeforereinstalling.
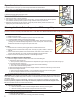
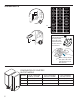
IMPORTANT - When replacing the propeller, make sure the propeller is properly aligned and seated on the
motor shaft. Some propellers may have an indicator; a wide, at surface to lineup with the at on the shaft
(illustration, right).
The newer propellers have an embossed D’, indicating how to position the propeller on the motor shaft.
Failure to push the propeller in all the way will cause the propeller to fuse with the whipper cham-
ber. This condition will not be covered under warranty.
6. Cleanthemountingplate.
a. Cleantheshaftwithaclothandmilddetergentbeforeremovingmountingplate.
b. Twistthemountingplateclockwiseandpullitfromthemotorshaft.