
Owner manual


2
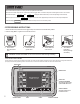
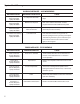
1.BrewershouldbeON(Conrmatthereartoggleswitch).TheLCDscreenshouldreadReadytoBrew.
2. Place an empty Milano 1½ gallon server under the brew cone.
6. Touch desired
brew button.
Brewing will begin
immediately.
5. Transferlledbrew
cone to brewer.
3. Place a clean
lterintothebrew
cone.
4. Fill brew cone with
ground coffee.
COFFEE BREWING INSTRUCTIONS
WARNING TO AVOID SCALDING, Do not remove brew cone while brew light is ashing.
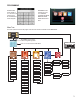
Touch Screen Control Module
The touch screen turns on when power is available to the controller. The screen will contain standard control feature such as symbols and buttons. Pressing these elements with
yourngertipwillactivatetheprogrammingfunctions.Thedefaultscreen,aswellassomeaddedcontrolbuttonsareshownintheillustrationbelow.
STATUS LIGHTS
BREW BUTTONS
CURTIS LOGO
TO ENTER PROGRAMMING
Tap Curtis logo 5 times to bring
up the ACCESS CODE screen.
RETURN TO HOME SCROLL RETURN TO PREVIOUS
UNDO
CONTROL SYMBOLS
All of these symbols may not
be visible at one time.
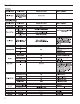
Your Curtis G4/Gold Cup Series is Factory Pre-Set for Optimum Performance.
After connection to water and power; turn on the brewer at the rear toggle switch. You will hear a beep and the status lights will come on for a moment.
The screen will display . Next is displayed. Water will ll the tank (2-3 minutes depending on water ow rate).
When the proper level is reached will appear on the screen. It takes approximately 30 minutes to reach the set point temperature.
Control will display when temperature reaches the set point. The unit is now ready to brew.
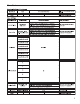
MODEL NUMBER
CONTROL BD NUMBER
READY TO BREW
HEATING
FILLING