
Owner's manual

26
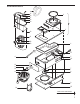
10A
10B
10C
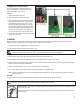
NOTE: Items, called out in this illustration, are
specic to Cafe 1DB, Cafe 3DB & Café AP.
All other parts are common.
NOTE:Duetoevaporation,watermaybelostfromthetankifbrewerisleftonforlongperiods
oftimewithoutmakingcoffee.Whenthisoccurs,pourinenoughwatertorelltheheatingtank
before brewing.
NOTE:Youshouldhaveatleasttwodecantersforbrewingcoffee.Oneforpouringwater,the
othertobrewcoffeeinto.Withairpotbrewers,apitcherthatholds74ouncesisrequired.
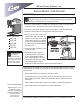
BREWING INSTRUCTIONS
1. Pour the proper amount of
ground coffee into the lter
and place it into the brew
cone. Shake the brew cone
to even the coffee bed.
2. Slide brew cone into guide
rails (Fig. 1., pg 1). Place
a clean empty decanter on
the warmer plate (model
Café AP uses an airpot).
3. When the green Ready to
Brew light comes on, pour
64 ounces or one decanter
of room temperature water
into opening on the top
cover. The brew time will be
about three minutes.
4. Switch on the warmer
plates to keep the coffee
at serving temperature.
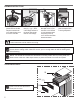
CAUTION:HOTLIQUID.AVOIDSCALDING.Thebrewconecontainshotcoffeegrounds.
Allow brewcone to drain before removing.
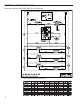
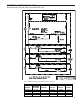
ILLUSTRATED PARTS
2