
User manual


WiebeTech
F o r e n s i c L a b D o c k U s e r M a n ua l ( A9 - 0 0 0 -0 0 1 1 R E V 1 . 0 ) - 6 -
NOTE:
You cannot use FireWire
and SATA connections at the
same time. Please unplug one
before attaching the other.
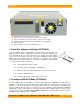
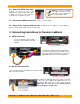
2.4 Attach the SATA data cable.
Connect one end to the rear of the
LabDock. Connect the other end to either
a SATA connector on the computer’s
motherboard, or a SATA host card.
2.5 Secure the LabDock into place.
Use the screws provided.
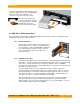
2.6 Close up the computer and turn it on.
Installation is now complete. To use LabDock,
turn it on via the power switch on the front of the unit.
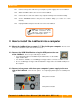
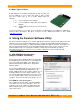
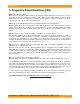
3. Connecting hard drives to Forensic LabDock
3.1 SATA hard drives
3.1.1 Insert the drive into the cubby.
Face the power and data connection
outward.
3.1.2 Attach the SATA power and SATA data
connections to the back of the hard drive. Then
connect the 4-pin power and the free end of the
SATA data cable to the front of the LabDock.
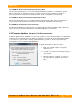
3.2 IDE (PATA) hard drives
3.2.1 Insert the drive into the cubby. Face the power and
data connection outward.
3.2.2 Attach the IDE and 4-pin power cable connections
to the front of the LabDock. The IDE interface uses a
SafeEject™ IDE connector to reduce wear and tear.
Make sure the levers are in the outward position
before plugging in the IDE cable.