
User manual


WiebeTech
F o r e n s i c L a b D o c k U s e r M a n ua l ( A9 - 0 0 0 -0 0 1 1 R E V 1 . 0 ) - 4 -
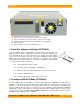
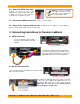
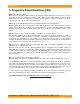
A. SATA data connection (primary data connection)
B. SATA power connection (power from computer’s power supply)
C. 4-pin Legacy Molex power connection (from computer’s power supply)
D. FireWire port (for firmware updates and HPA/DCO mode configuration)
E. Drive Cooling Fan
F. USB B port (data connection for USB WriteBlocker)
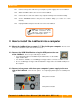
1.3 Host Bus Adapter Installation (OPTIONAL)
Forensic LabDock requires a SATA data connection inside your computer. The
FLDu model also requires a USB data connection for the write-blocked USB port.
If you already have the necessary connectors in your computer, you may skip this
step. If not, you can add the necessary connectors by installing a host bus adapter
(HBA) card into an empty expansion slot inside your computer. The following
general steps will work for most cards. Instructions for individual cards may vary,
so consult your host card’s user manual.
1.3.1 Power down the computer system.
1.3.2 Insert the card into an available, compatible slot.
1.3.3 Make sure the card is fully seated in the slot. Secure with a screw.
1.3.4 Turn the computer back on.
1.3.5 Install the appropriate software drivers for the card.
1.4 Configure HPA/DCO Mode (OPTIONAL)
Forensic LabDock gives you the ability to select the way hidden areas (HPA/DCO) on hard drives are
handled. Use the Forensic Software Utility, a free software application designed for usage with Forensic
LabDock, to select the desired mode of operation (See section 3.1 of this manual). In default mode,
Forensic LabDock will only notify you of the presence of these hidden areas by blinking the HPA/DCO
LED indicator. Other modes allow you to view the information in these hidden areas. To change modes,
you must connect Forensic LabDock with a FireWire connection. You may find this easiest to do before
installing Forensic LabDock inside a computer.
REAR